FREE 1 to 3-Day Delivery on Orders $149+ Details
How to Install Rough Country 1.25 in. Body Lift Kit on your Ram
Installation Time
3 hours
Tools Required
- Jack
- Jack Stands
- Wood Blocks (2x4)
- Pliers
- Hammer
- Phillips Screwdriver
- Drill Motor
- 1/4” Drill Bit
- 1/2” Drill Bit
- Reciprocating Saw
- 8mm Socket
- 10mm Socket / Wrench
- 14mm Socket / Wrench
- 13mm Socket / Wrench
- 15mm Socket / Wrench
- 16mm Socket / Wrench
- 18mm Socket / Wrench
- 19mm Socket / Wrench
- Hand Grinder
- Clamp

Shop Parts in this Guide
Kit Contents:
2-Fr Bumper Relocation Brackets
2-Rr Bumper Relocation Brackets
1-Rr Bumper Center Reloc Brkt
8-Cab Spacers
6-Bed Spacers
4-Bed Spacers w/ stud
1-Poly Bag Containing:
16-3/8” x 2 1/4’ Bolts
32-3/8” Flat Washers
16-3/8” Lock nuts
2-Rr Spare Tire Winch Sleeves
2-8mm x 60mm Bolts
2-8mm Flat Washers
6-12mm x 65mm Bolts
6-12mm Flat Washers

CAB INSTALLATION INSTRUCTIONS
1. Raise hood disconnect positive and negative battery cable from the battery using 10mm wrench. This is done because of airbags. Check owners manual and remove airbag fuses to prevent accidental air bag deployment.
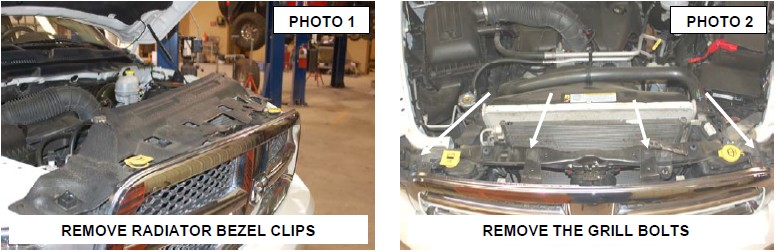
2. Remove clips holding radiator bezel by pulling up on bezel at each clip using pliers if needed. See Photo 1.
3. Remove four bolts holding grill on using 10mm pull on lower part of grill to remove from truck. See Photo 2.
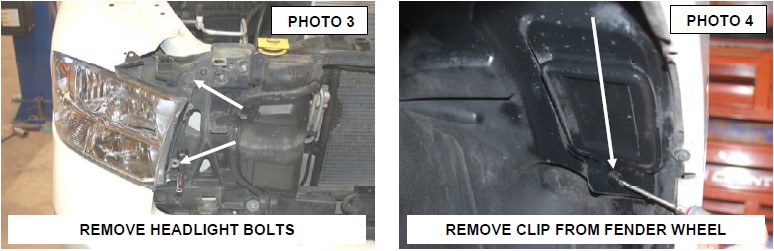
4. Remove two bolts from headlights using 10mm. See Photo 3. Remove clip from inner fender well to gain access to rear of headlamp. See Photo 4.
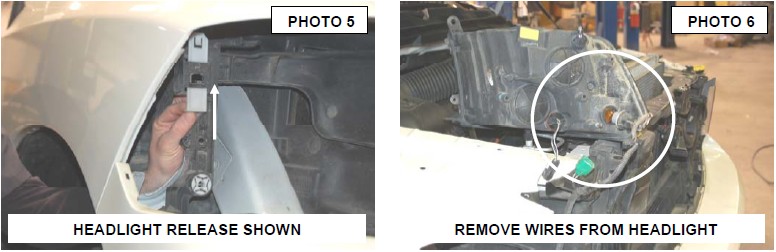
5. Push up on clip as seen in Photo 5 to release the headlight.
6. Unplug all wires and remover the headlamp from the truck. See Photo 6. Repeat for other side.
7. Remove painted bumper cover using 10mm and 8mm socket. There are 8 bolts 1 behind each headlamp and four on bottom of bumper and 2 bolts ( 8mm )on inner fender well. See Photo 7 & 8.

8. Remove clips that attach bumper to inner fender well (4 of these). See Photo 9. On topside of bumper there 9 tabs that must be unclipped. See Photo 10.(Models with chrome bumper will not have 4 bolts on the bottom or clips on fender wells). Remove the bumper cover from the vehicle.

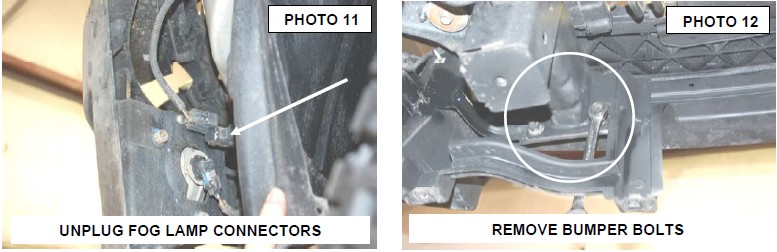
9. On driver side unplug and pull connector off of bumper above fog lamp. Then remove 6 nuts from bumper using 18mm wrench. (3 on each side). See Photo 11 & 12.
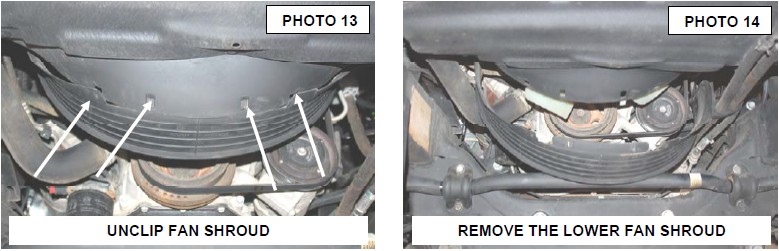
10. Undo the clips on lower fan shroud pull down and remove. See Photo 13 & 14.
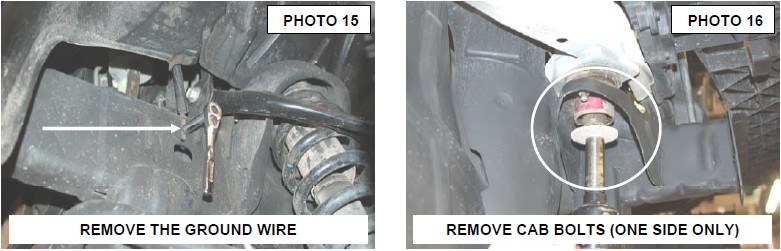
11. Using a 10mm remove ground wire from frame on driver side. See Photo 15.
12. Loosen all cab body mounts. On one side of the cab only, remove the bolts using a 18mm socket. See Photo 16. Retain the factory hardware.
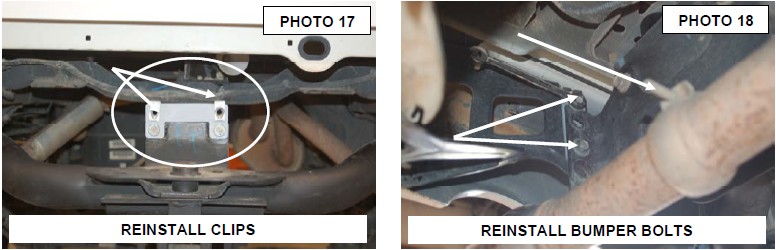
13. Using a 16mm remove nuts from body mounts. See Photo 17.
14. Using jack stand lift body slowly from the frame. See Photo 18.

15. Remove body mounts from one side of the vehicle.
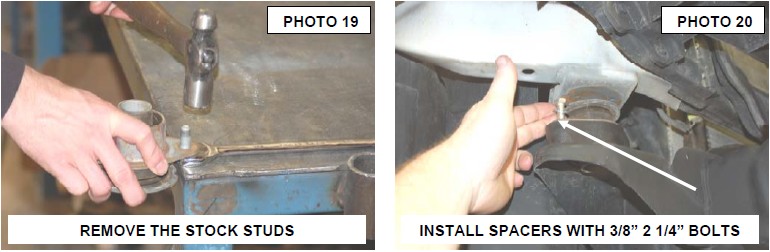
16. Remove studs from them using a hammer and a wrench. See Photo 19. Retain two for reuse on rear.
17. Install new body spacers using supplied 3/8” x 2 1/4” bolts, washers and nuts. 2 per mount. See Photo 20.
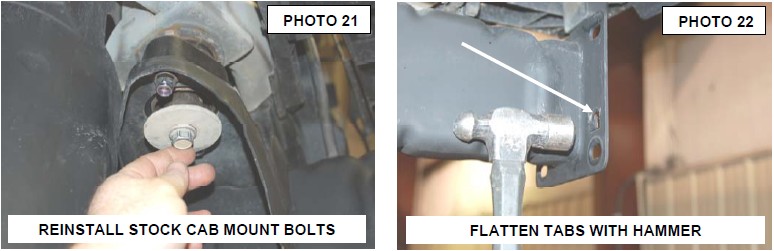
18. Reinstall body bolts as shown in Photo 21 and lower body back down on frame.
19. Proceed to opposite side and install body spacers. Do not tighten until both sides are finished.
20. Using 14mm wrench and socket tighten new 3/8” bolts then tighten stock body bolts using 18mm socket.
21. After all body bolts a tight reinstall ground wire on driver side using 10mm wrench.
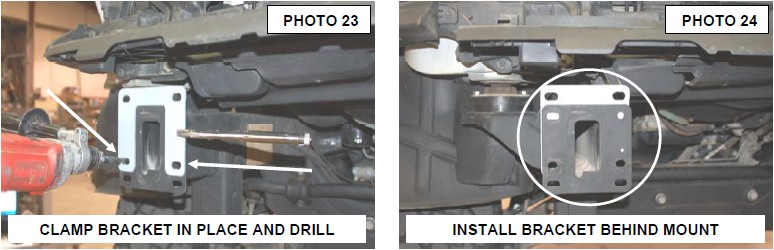
22. On the factory bumper frame mount flatten the metal tab with hammer until its flush with outside. This is done because you will be drilling into it. See Photo 22.
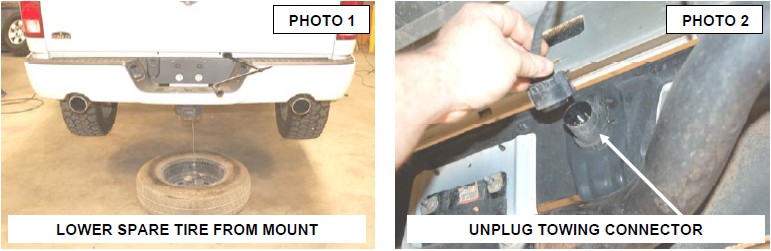
23. Using new bumper mount as a guide, clamp in place and drill new 1/2” holes. See Photo 23. If needed use smaller drill bit to make a pilot hole first. Test fit bumper to make sure holes line up.
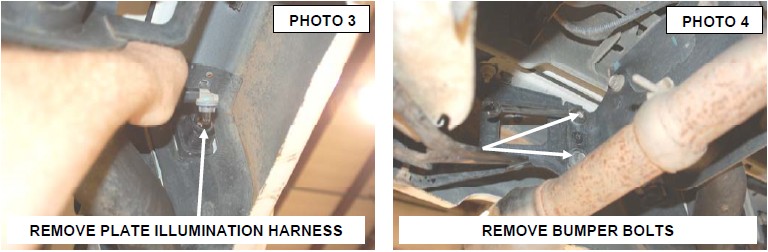
24. After holes are drilled, install new bumper mount behind frame mount and install bumper into new holes. Install factory nuts using 18mm wrench. See Photo 24.
25. Reattach fog light harness on driver side.
26. Install painted bumper cover using 8 and 10mm wrenches with factory hardware, making sure bumper fits properly .
27. Install all clips then install headlamps. Pull down on clip inside fender well to lock headlamp in place. Install factory bolts.
28. Reinstall grill and then radiator bezel.
BED INSTALLATION INSTRUCTIONS
1. Using a screwdriver remove license plate.
2. Find the spare tire tools under passenger side seat and remove spare tire from truck. See Photo 1.
3. Unplug trailer and lighting harness from bumper. See Photo 2 & 3.
4. Using 13mm and 15mm wrench remove bolts from bumper on both sides. See Photo 4. Retain stock hardware.
5. Remove the center bolts from bumper using 15mm socket and remove. See Photo 5. Retain stock hardware.
6. Remove the 6 bolts from truck bed using 18mm socket. See Photo 6, 7 & 8.

7. With jack stands or another method raise bed off of frame just enough to get body spacers in. Be sure to monitor gas fill lines and take care not to over extend.
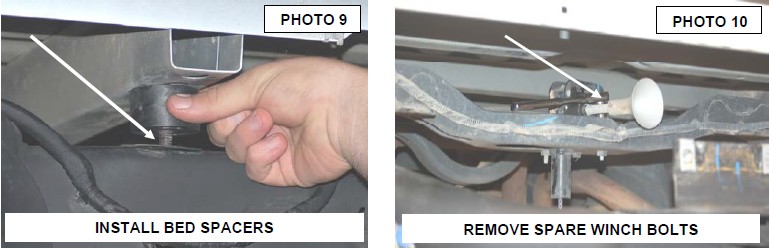
8. Install body spacers where factory bolts were removed. For 4 non bolt locations, install the supplied spacers with the pressed in pin to hold them in place. See Photo 9.
9. Lower bed back on to frame. Install supplied 12mm x 65mm bolts& flat washers in factory mount locations.
10. Using a 19mm tighten all bolts bed bolts.
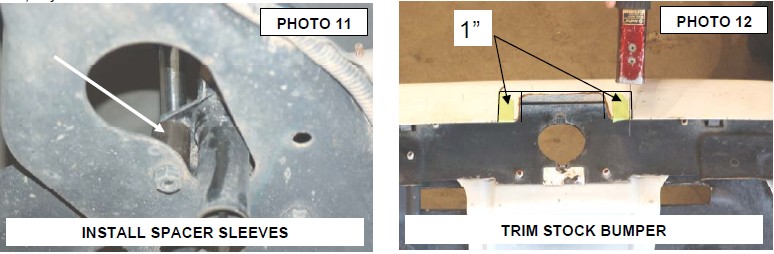
11. Using a 13mm socket remove spare tire winch. See Photo 10.
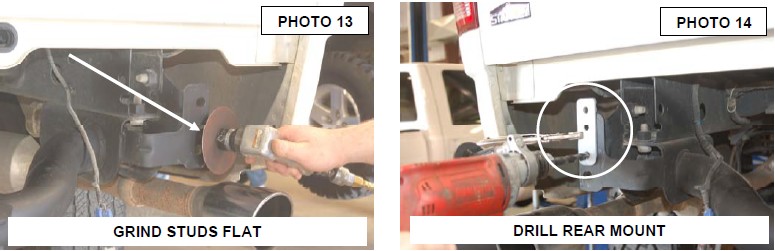
12. Install the 2 supplied sleeves and 12mm x 65mm bolts & washers between the spare tire winch and the frame. See Photo 11. Tighten bolts using 13mm socket.
13. On the bottom of rear bumper measure 1 inch on each side of center gap and mark it. Using body saw cut pieces off ,only cut 1 inch from side. See Photo 12.
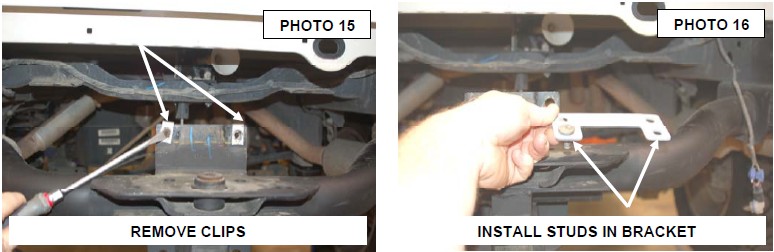
14. On rear bumper mounts, grind the stock pins flat on both front and back sides of the mount. See Photo 13.
15. Clamp the new bumper bracket in place and using the new rear bumper bracket as a guide, mark hole and drill using 1/2 drill bit. See Photo 14.
16. Remove the 2 clip from center of hitch using a screwdriver. See Photo 15.
17. Install 2 studs from front body mounts that where removed into new center bumper bracket with hammer or a socket and a hammer. See Photo 16.
18. Install center bumper bracket as shown using 16mm to tighten. Reinstall clips. See Photo 17.
19. Install bumper back onto truck using stock center bolt first but do not tighten. Make sure cut out goes around hitch.
20. Install new side bumper brackets using stock bolts.13mm and 15mm wrenches. See Photo 18.
21. Make sure bumper is centered on truck. Tighten all bumper bolts.
22. Plug in trailer and lighting wiring harness. Install license plate and spare tire.
23. If factory equipped, loosen exhaust tips as shown using 13mm and move to the desired location and retighten. Do not get tips too close to bumper. See Photo 18
24. Reconnect battery using 10mm.
POST INSTALLATION INSTRUCTIONS
1. Check all fasteners for proper torque. Check to ensure for adequate clearance between all rotating, mobile, fixed, and heated members. Test and inspect brake system.
2. On some vehicles the front lower skirting will need to be trimmed if using certain wheel /tire combinations and with heavy offset wheels. Trim only as needed.
3. Activate four wheel drive system and check front hubs for engagement.
6. Perform head light check and adjustment to proper settings.
7. All kit components must be retightened at 500 miles and then every three thousand miles after installation. Periodically check all hardware for tightness.
8. Install “Warning to Driver” decal on sun visor.