FREE 1 to 3-Day Delivery on Orders $149+ Details
How to Install Yukon Gear 9.75 in. Rear Ring Gear and Pinion Set - 3.55 on your F-150
Tools Required
- Dial indicator
- n Precision calipers or micrometer
- Gear-marking compound and a clean brush
- n Bearing pullers
- Bearing press
- 10- or 12-inch spanner wrench or Yukon spanner tool
- Three-foot-long breaker bar or strong impact gun
- Pinion nut socket
- Ring gear bolt socket
- Main cap bolt socket
- – 6-point or 12-point cross-pin bolt wrench (as applicable)
- Brake line wrench
- Pry bars for removing the carrier case
- 24-oz. ball peen hammer
- 48-oz. sledgehammer
- 48-oz. plastic-face dead-blow hammer
- – Assorted brass drifts for removing bearing races
- Yukon bearing race drivers
- – Center punch or number stamp for marking main caps
- Oil drain pan
- n Torque wrenches in both pound/foot and pound/inch increments.

Shop Parts in this Guide
Disassembly
1. Ensure that you have everything you need before working. Verify whether all new parts match the application and parts invoice.
2. Lift the vehicle using an appropriate lift or jack, and support the vehicle with approved jack stands. Never work on an unsupported vehicle.
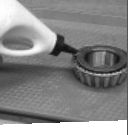
3. Drain used gear oil into a suitable container. We recycle our waste oil and request that you recycle yours, too.
4. Remove the axle shafts.
5. Mark the main caps for reinstallation on the appropriate side and in the correct orientation.
6. Mark all shim thicknesses and locations during disassembly.
7. Thoroughly clean and inspect all parts.

Order of Adjustments
Differential assembly and setup adjustments include:
1. Pinion Depth
2. Pinion-Bearing Preload
3. Backlash
4. Carrier-Bearing Preload Shim Selection For a baseline, reassemble the differential with the shim combinations that were used in the differential during the previous assembly.
Parts Preparation
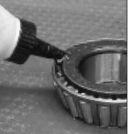
Clean all parts, including all new components, with solvent or brake cleaner, and thoroughly wash out the axle housing’s interior. Ensure that the oil passages that feed the pinion and the grooves behind the carrier bearings are free from any metal particles.
Seal Preparation
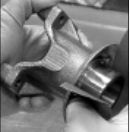
Polish all seal surfaces with fine-grit emery cloth or sandpaper. Wipe all surfaces with a clean rag dampened with either fresh oil or solvent to remove any metal particles.
Assembly Oil
When assembling internal components, coat all bearings, and seal surfaces with fresh gear oil. Never use bearing grease on pinion or carrier bearings; it will negatively influence assembly readings. Coat all seals with grease, preferably white lithium grease. Use clean gear oil if white grease is not available.
Pinion Trial Assembly
Assemble the pinion with its original shims yet without a crush sleeve to establish an approximate pinion depth. When installing the pinion, tighten the nut slowly until it reaches preload specifications.
Initial Carrier Assembly
Install the assembled gear carrier with its ring gear into the housing. It is easier to remove and replace the carrier during trial assemblies if the carrier bearing preload is fairly snug instead of tight.
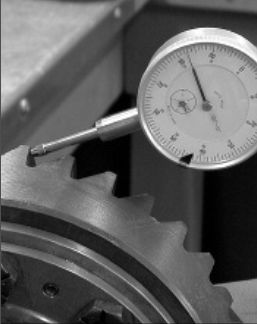
Adjusting Initial Backlash
Backlash refers to the amount the ring gear can rotate forward and backward when the pinion gear cannot move. This initial backlash setting sets the basis for all future adjustments. See page 11 for backlash specifications. Fasten a dial indicator to the gear case or axle housing on the same plane as the ring gear so its contact point touches a tooth at the outermost diameter of the ring gear 90 degrees to the tooth face. The indicator should measure the amount the ring gear moves when rotated. To measure backlash, prevent the pinion gear from rotating and rotate the ring gear back and forth. The amount the ring gear can move determines the amount of backlash. When changing the backlash bear in mind that the backlash setting changes about 0.007” for each 0.010” that the carrier moves. For example:
Move the carrier 0.010” toward the pinion to decrease the backlash by 0.007”.
Move the carrier 0.010” away from the pinion to increase the backlash by 0.007”. While not all ring-and-pinion sets will react exactly this way, these figures serve as a good guideline.
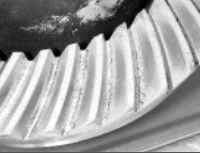
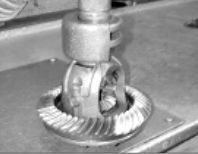
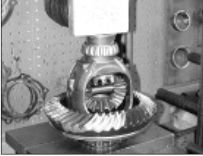
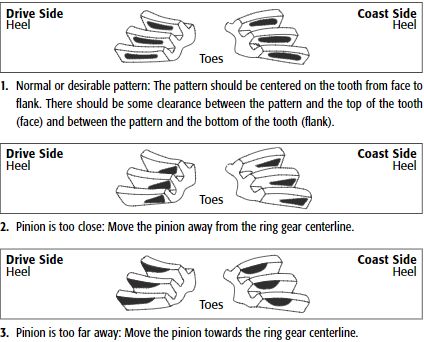
Checking the Pattern
We can determine how gears mesh by changing how close the pinion gear is to the ring gear centerline. While we can’t see how the gears actually relate to each other, we can coat their mating surfaces with gear-marking compound and read the patterns the gears create as they mesh. Genuine gear-marking compound offers a clear indication of gear contact without running or smearing. Anything other than gear marking compound (such as blue machinist dye) will not give a clear indication of tooth contact. Dilute the marking compound with a small amount of oil if necessary to create a smooth, but not runny, paste. Coat three or four ring-gear teeth in at least two places with a moderate amount of compound and rotate the ring gear four or five times around the pinion gear in both directions. Rotate by grabing and turning the ring gear, not the pinion. Pinion resistance against the rotating ring gear helps establish a good pattern. Pinion bearing preload usually provides enough resistance for a good pattern, but additional resistance can be added by wrapping a shop towel around the yoke and pulling the two ends tight.
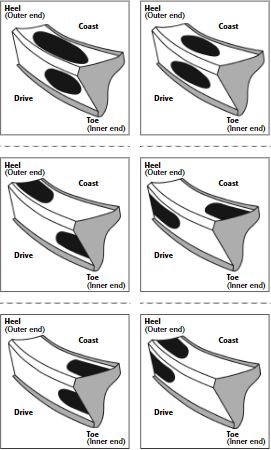
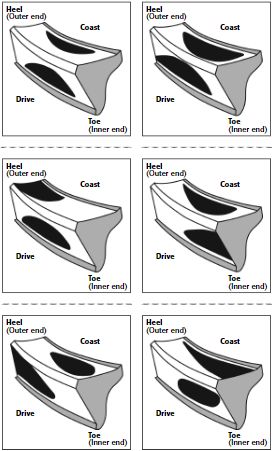
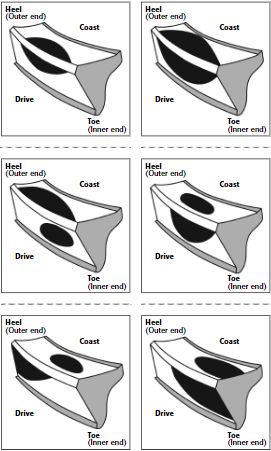
Important Pattern Information
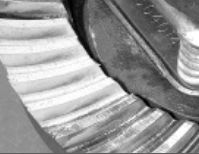
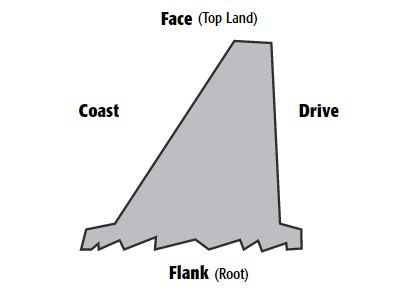
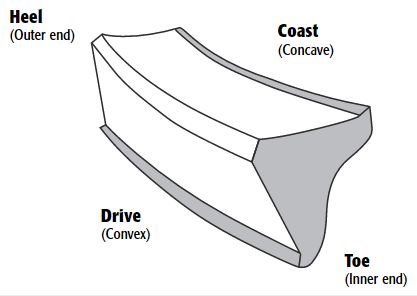
The pattern’s position to the tooth face (ridge) and flank (valley) notes the pinion depth. Disregard the pattern’s position to the tooth’s heel (ring gear outside diameter) or toe (ring gear inside diameter). Gear patterns change from heel to toe, but in most cases an ideal heel-to-toe pattern is impossible to achieve. Furthermore, the housing itself influences the heel-to-toe pattern and the pattern cannot be changed without machine work. Trying to obtain a pattern centered exactly between the heel and toe usually leads to frustration and a noisy gear set, if the face to flank pattern is not correct. Instead, concentrate only on the position of the pattern and how it relates from face to flank of the ring gear teeth.
A contact pattern centered from face to flank indicates the correct pinion depth.
A contact pattern closer to the gear face means the pinion is too far away from the ring gear. To correct the pattern, move the pinion toward the ring gear centerline.
A contact pattern closer to the gear flank means the pinion is too close to the ring gear. To correct the pattern, move the pinion away from the ring gear centerline. Used Gear Sets When setting up a used ring and pinion, concentrate only on the pattern created on the coast side of the ring gear teeth. Pay little attention to the drive side. This is true for most used gear sets, although both the coast and drive sides should be considered in some instances.
Adjusting Pinion Depth
When changing the pinion depth, make large changes until the pattern is close to ideal. Consider 0.005” to 0.015” a large change and 0.002” to 0.004” a small change. Intentionally make adjustments that move the pinion too far at first. If the pinion moves too far and the pattern changes from one extreme to the other, the correct pattern lies somewhere between the two extremes. Once you get close to the correct pinion depth, make smaller changes until the pattern centers between the face and the flank of the ring gear teeth. Once the backlash and pinion depth meet tolerances, remove the carrier and establish the final pinion bearing preload.
Pinion Bearing Preload
The pinion bearing preload is related to the amount of force the pinion nut exerts on the pinion and its bearings. Axle builders generally measure the pinion’s preload by rotating the pinion gear by its nut with a pound/inch-graduated torque wrench. Axles generally use crush sleeves or shims to set pinion preload. Despite the difference, one thing remains the same: oil the pinion nut washer surface during all assembly procedures and apply medium-strength thread-locking compound (red) to the pinion nut threads during final assembly. A lubricated washer reduces friction and prevents the nut and washer from galling during tightening procedures. The thread-locking compound helps retain the nut position and pinion bearing preload. Before setting the final pinion bearing preload, install the pinion seal, slinger (if applicable), and crush sleeve (if applicable).
Crush Sleeve Design
Setting the pinion bearing preload in differentials that use a crush sleeve is relatively easy, although final assembly always requires a new crush sleeve. The crush sleeve permanently distorts, or crushes, at approximately 300 to 400 pounds/feet of torque on the pinion nut. Tighten the pinion nut until it exerts the optimum bearing preload, as measured by the pounds/inch torque wrench on the pinion nut. While setting preload with a crush sleeve is easy, it requires a certain amount of patience. Pinion preload doesn’t exist until the bearings contact the races, but the preload increases rapidly once the bearings meet their races. Tighten the nut in small increments until the preload reaches the ideal setting. Take plenty of time to set the preload, since tightening the pinion nut beyond the ideal preload threshold effectively destroys the crush sleeve. The only remedy for excessive preload involves a new crush sleeve and another attempt to establish proper preload. After reaching the correct preload, moderately tap both ends of the pinion to seat the bearings, races and yoke. Do not strike the pinion too hard, as excessive force may damage the bearings. Carefully double check the preload after seating the bearings.
Preload Shim Design
Setting pinion bearing preload in differentials that use shims exclusively often requires several attempts. Carefully clean the shims, as dust and metallic particles on the shim surfaces cause false preload readings. Start the procedure with the original shims, or add 0.003” to the original shim-pack dimension to compensate for the amount the bearings settled into the housing. Tighten the pinion nut slowly to avoid damaging the bearing should the shim stack prove too thin. The pinion nut torque varies by thread size but is usually between 200 and 300 pounds/feet. Measure the preload by rotating the pinion with the pound/inch torque wrench. If the preload doesn’t meet the axle manufacturer’s specifications, change the shim pack dimension in one of the following ways:
Remove shims to increase pinion bearing preload.
Add shims to decrease pinion bearing preload
Write down each shim-pack combination and its resulting preload when changing shims. After reaching the correct pinion-bearing preload, moderately tap both ends of the pinion to seat the bearings, races and yoke. Do not strike the pinion too hard, as excessive force may damage the bearings. Carefully double check the preload after seating the bearings.
Final Backlash and Carrier Bearing Preload Adjustments
After setting the pinion depth, backlash, and the pinion bearing preload, set the carrier bearing preload. Three different shim or adjustment methods, screw adjusters, outside shim design, and inside shim design, cover most differentials. Screw Adjuster Design The easiest method uses screw adjusters to set the backlash and carrier bearing preload. Carefully oil the adjuster threads on both the housing and on the adjusters themselves. Note the order in which you tighten the adjusters so the backlash remains consistent, even when subjected to heavy loads. The pinion gear always forces the ring gear away from itself whenever it transfers power. Start with a looser backlash setting than the axle’s manufacturer calls for and always ensure that the last adjustment made to the left adjuster tightens it. If the backlash becomes too tight, loosen the left adjuster first, followed by tightening the right adjuster. To reestablish the backlash setting, tighten the left adjuster. Ensure that the last adjustment made to the left adjuster tightens it to eliminate any space between it and its bearing race. Any space or looseness on the left side will let the carrier deflect when under load, and this will allow backlash to open up when driven under load. Once the backlash approaches the manufacturer’s recommendations, tighten both left and right adjusters evenly to increase carrier bearing preload. Set the carrier bearing preload to approximately 150 to 200 pounds/feet. It is difficult to damage bearings with excessive carrier bearing preload on a screw-adjusted differential.
If the preload is close and the backlash is too loose, tighten the left adjuster a notch or two until the backlash is correct and the preload is sufficient.
If the preload is close and the backlash is too tight, tighten the right adjuster until the backlash is correct and the preload is sufficient. As stated before, ensure that the last adjustment made to the left adjuster tightens it. That will eliminate the possibility of a space between the adjuster and the bearing race.
Outside Shim Design
This design uses shims between the carrier bearing races and the housing. Initially set the backlash with very little carrier bearing preload. After setting the backlash, add equal amounts of shims to both sides of the carrier to set the carrier bearing preload as tight as possible without damaging the shims (carrier bearings in this axle design hardly ever fail due to excessive carrier bearing preload).
If the preload is close and the backlash is loose, add shims to the left side. This increases the carrier bearing preload and tightens the backlash at the same time.
If the preload is close and the backlash is too tight, add shims to the right side. This increases both the carrier bearing preload and the backlash at the same time.
Inside Shim Design
This design uses shims between the carrier bearing and the case. Initially set the backlash tight and the preload light, as it will make carrier removal and installation easier. After setting the backlash, add equal amounts of shims to both sides until the correct preload is achieved.
If the preload is close and the backlash is loose, add shims to the left side. This increases the carrier bearing preload and tightens the backlash at the same time.
If the preload is close and the backlash is too tight, add shims to the right side. This increases the carrier bearing preload and the backlash at the same time.
Pattern
Now that the pinion depth, pinion bearing preload, backlash, and carrier bearing preload are set, check the pattern one last time to make sure that it is correct.
Oil
When filling the axle with oil, use a high quality name brand and fill the unit to the manufacturer’s recommended capacity. Synthetic oil is recomended for most applications.
Checking Backlash
Backlash is the free movement of the ring gear with the pinion gear fixed in place. All ring and pinion sets are matched pairs. Make sure you have a matched ring and pinion set. Clean all parts before you start assembly. Apply a light coat of oil to all bearings. Examine all components and remove any burs, nicks or sharp edges that could cause components seat improperly. 1. Set backlash to proper clearance. (See page 11) 2. Shim or adjust the ring gear away from or closer to the pinion to get the correct backlash. 3. The pinion bearing preload should match those recommended on the specification sheet (See page 2). Achieve the recommended preload with a preload shim pack (combine shims of various thicknesses) or a collapsible crush sleeve. Use a new crush sleeve during final assembly. 4. Achieve the pinion depth by shimming the pinion toward or away from the ring gear centerline. Start with the same shim thickness on the new gear set as on the old set. Note that not all housings are shimmed in the same location.
Pattern Movements Summarized
1. Move the ring gear closer to the pinion to decrease backlash.
2. Move the ring gear farther from the pinion gear to increase backlash.
3. Move the pinion closer to the ring gear to move the drive the pattern deeper on the tooth (flank contact) and slightly toward the toe. The coast pattern will move deeper on the tooth and slightly toward the heel.
4. Move the pinion further away from the ring gear to move the drive pattern toward the top of the tooth (face) and slightly toward the heel. The coast pattern will move toward the top of the tooth and slightly toward the toe.
New Gear Break-In
All new gear sets require a break-in period to prevent overheating damage. Any overloading or overheating will break down the gear oil, which will cause the ring and pinion to fail. This can be determined by inspection and will void the gears’ warranty. Please follow these guidelines to insure proper break-in. n Avoid heavy acceleration during the break-in process.
Drive the vehicle lightly for the first 15 to 20 miles and stop. Let the differential cool before proceeding. n Avoid heavy acceleration for the first 100 miles.
Drive the vehicle at least 500 miles before towing to retain the gears’ warranty.
When towing for the first time, drive for a very short distances (less than 15 miles) with the full load and stop. Let the differential cool for about 20 minutes before proceeding. Repeat this procedure two more times (45 miles total) to fully break in the gears. n Change the oil after the first 500 miles. This will remove any metal particles and phosphoric coating shed by the gear set during the gears’ break-in period. These towing instructions may seem unnecessary to most people, but we have seen many differentials damaged from being loaded before the gear set was fully broken-in.