FREE 1 to 3-Day Delivery on Orders $149+ Details
How to Install Mopar Fuel Level Gauge - Digital Stepper Motor - Black on your Dodge Ram
Read instruction thoroughly to verify all required parts are there before installing this product.
Contents:
For Fuel Level Gauge
1 - Wire Harness 8 ft.
2 - Aluminum Thumb Nuts
1 - Mounting Bracket
2 - Lock Washers
1 - Rubber Grommet
Installation
1. Check that you have all parts required for installation, and that the engine is cool.
2. Disconnect the negative (-) battery cable.
3. Gauge mounts in a 25⁄8” hole for 25⁄8” gauges, and a 21⁄16” hole for 21⁄16” gauges.
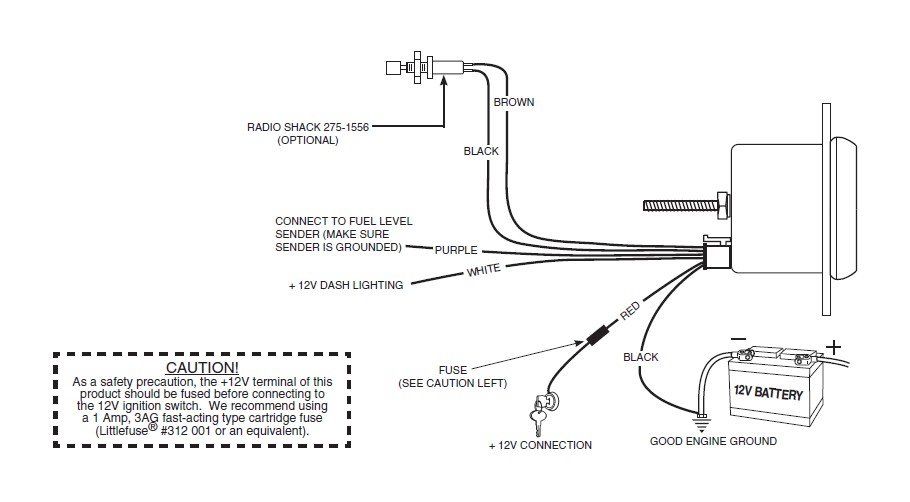
4. Connect the purple sender wire to the fuel level sender. Existing wires may be used, or route the purple sender wire to the fuel tank. (The stock fuel level gauge, if equipped, must be disconnected.)
5. Connect the white wire to dash lighting or switchable 12v light source.
6. Connect one of the black wires to a good ground. (Either black wire, does not matter which one)
7. Connect the red power wire to a switched 12v source.
8. Reconnect the negative (-) battery cable.
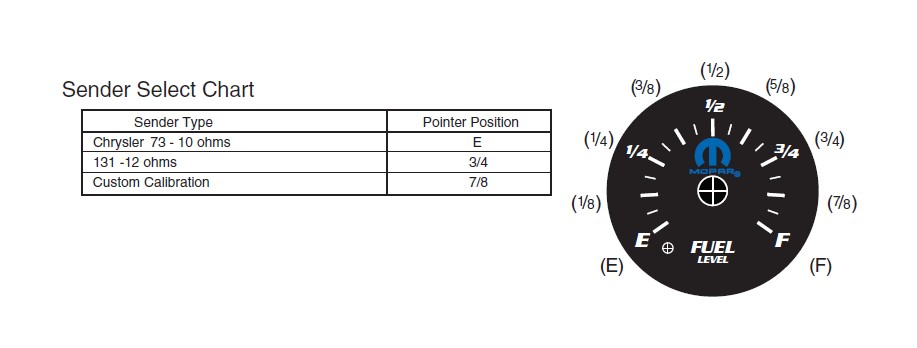
Setting the Sender Type
1. Connect a Radio Shack 275-1556 or equivalent momentary switch to the black and brown wires (see illustration above), or alternately touch the stripped ends of the black and brown wires to simulate pushing the button.
2. Press and hold the button, and apply power to the gauge. The pointer will sweep back and forth stopping momentarily on each 1⁄8-tank mark, indicating that the gauge is in sender select mode.
3. Allow the pointer to move to the appropriate location on the dial per the sender select chart (see next page), and release the pushbutton. The pointer can be bumped to the next position by momentarily pressing the button.
4. Remove power from the gauge to store the new sender type by turning off ignition switch.
5. Re-apply power to the gauge, and confirm that it reads the proper fuel level. If the proper fuel level is not read, return to step 3 and recalibrate. If the proper fuel level is still not indicated, perform Custom Sender Calibration.
6. Remove power from the gauge by turning off ignition switch.
7. Remove switch if used, and tape the ends of the brown and black wires, so they can not touch.
8. Coil the wires up under the dash.
Custom Sender Calibration
The fuel level gauge can be custom calibrated to accurately display the output from any fuel level sender with an output between 0 and 270 ohms.
1. Make sure the fuel level sender is connected to the gauge and that the fuel tank is empty, or nearly empty, before proceeding.
2. Connect a Radio Shack 275-1556 momentary switch to the black and brown sender select wires (see illustration on previous page) or alternately, touch the stripped ends of the brown and black wires to simulate pressing the button.
3. Press and hold the button, and apply power to the gauge. The pointer will begin sweeping back and forth stopping momentarily on each 1⁄8-tank mark indicating the gauge is in sender select mode. The pointer can be bumped to the next position by momentarily pressing the button. Allow the pointer to reach the 7⁄8-tank position and release the button.
4. Remove power from the gauge to enter custom calibration mode.
5. Re-apply power to the gauge, the pointer will move to a position just below the empty mark, indicating that the empty calibration point can be entered.
6. With an empty, or nearly empty tank, capture the empty calibration point by momentarily (less than one second) pushing the switch. After approximately 1 second, the pointer will move to just above the full mark.
7. Fill the tank and momentarily press (less than one second) the sender select button or touch the brown and black wires to capture the full calibration point. After approximately one second, the gauge will reset, and begin reading fuel level per the custom calibration.
8. Confirm that the gauge reads the proper fuel level.
9. If the proper fuel level is read, go to step
10. If proper fuel level is not read, return to step 3 and recalibrate. 10. Remove switch if used, and tape the ends of the brown and black wires, so they can not touch.
Sender Error
If no sender is connected, the pointer will move to the empty position indicating an error. Approximately 4 seconds after the sender is connected, the pointer will move to the indicated fuel level and will resume normal operation.
Power-Up
The pointer will move backward to the stop pin and then display actual fuel level. This procedure is an auto-calibration function and is performed on every power-up. While this test is being performed, the gauge may make a clicking sound. This is normal.