 FREE 1 to 3-Day Delivery on Orders $149+ Details
How to Install Mopar Boost Gauge - Mechanical - Black on your Dodge Ram

Shop Parts in this Guide
Read instruction thoroughly to verify all required parts are there before installing this product.
Contents:
For Boost & Oil Pressure Gauge
1 - Nylon Tubing – 10 ft.
1 - Brass Adapter - 1⁄ 8" Female to ¼" Male
1 - Compression Fitting – 1⁄ 8" NPT Male
1 - Compression Fitting – 1⁄ 8" NPT Female
2 - Ferrules
2 - Aluminum Thumb Nuts
2 - Rubber Grommets
1 - Mounting Bracket
2 - Lock Washers
For Boost/Vac Gauge
1 - Nylon Tubing – 10 ft.
2 - Compression Fittings – 1⁄ 8" NPT Female
2 - Ferrules
2 - Aluminum Thumb Nuts
1 - Rubber Grommet
1 - Mounting Bracket
2 - Lock Washers
Meter Adapters
If this product is to be installed on a vehicle requiring metric fittings, please contact your local Mopar dealer to purchase metric adapters.
Pressure, Vacuum & Boost Gauges
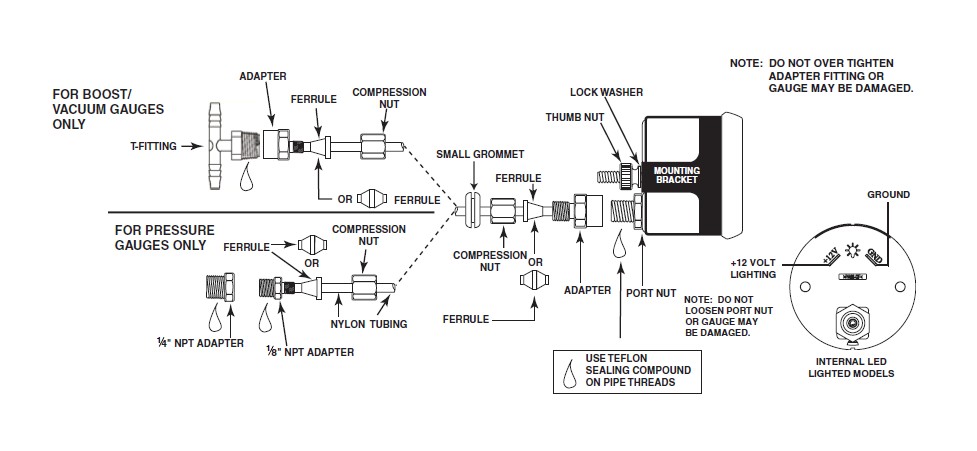
NOTE: Some late model vehicles use electronic sensors in their pressure and temperature senders for engine control functions. Before removing the original sender, we recommend that you contact your automotive dealer to be sure no critical functions will be disrupted. With pressure gauges, it is beneficial to add a T-fitting to install your new gauge and to keep the warning light operational. This allows you to monitor the pressure and still have a warning light to indicate emergency conditions.
1. Gauges may be mounted in In-dash holes, or in Mopar custom mounting Solutions. Secure gauge with mounting clamps supplied. 2-1⁄16”gauges mount in 2-1⁄16” diameter hole, 2-5⁄8” gauges mount in 2-5⁄8” diameter hole.
2. Drill 3⁄8” dia. holes and install rubber grommet where pressure or vacuum line passes through sheet metal, such as firewall.
3. Attach nylon pressure line to fitting on back of gauge using adapter, ferrule, and compression nut as shown in diagram above. Route line through grommet to engine compartment. Connect line to pressure port on engine by using 1⁄8” adapter (1⁄4” if needed), ferrule and compression nut for pressure gauges or ferrule, compression nut, and T-fitting for vacuum and boost gauges.
4. Make sure line is free from hazard of moving parts or hot engine components. It is recommended that an Auto Meter 3224 copper tubing kit be used where a potential hazard exits.
5. Start engine and thoroughly check installation for leaks.
6. Twist in light socket assembly and connect one wire to dash lighting circuit or other 12V power source and the other wire to a good ground.


