FREE 1 to 3-Day Delivery on Orders $149+ Details
How to Install Mopar 5 in. Pedestal Tachometer w/ Shift Light - White on your Ram
Read instruction thoroughly to verify all required parts are there before installing this product.
For Tachometer
2- Mounting Screws
1- Light Cover-Yellow
INTRODUCTION
• Any Auto Meter Shift-Lite™, or Quick-Lite™ Shift-Lite can be used with tachs equipped with a black, Shift-Lite connector.
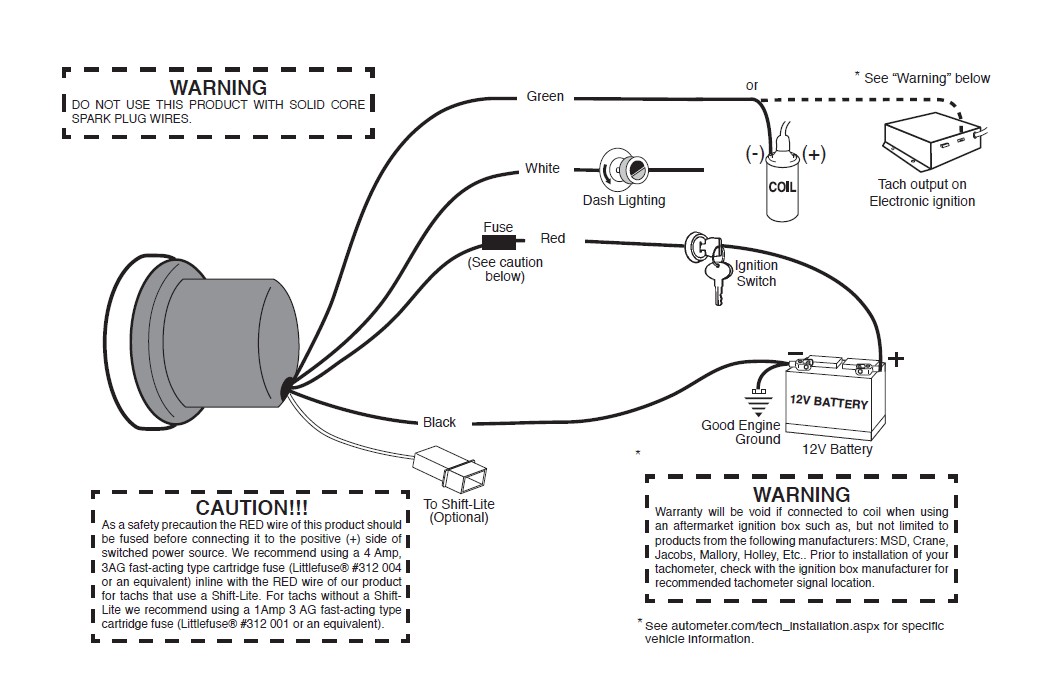
NOTE 1: This tachometer has an air core meter. With power off, it is normal for the pointer to leave zero. When 12V power is applied, the pointer will move to the correct position.
2. Calibration for model P5155500
If you are unsure of your vehicle’s pulse(s) per revolution or specific calibration requirements, contact Auto Meter Tech Support at (815) 899-0801 or go to http://hp.autometer.com/ techtips/.html for information.
8 CYL. (4 Pulse) — NO adjustment is necessary.
6 CYL. (3 Pulse) — Clip BROWN wire loop only.
Insulate with electrical tape.
4 CYL. (2 Pulse) — Clip BLUE wire loop only.
Insulate with electrical tape.
4 CYL. (1 Pulse) — Clip BROWN and BLUE
wire loops. Insulate with electrical tape.
WARNING: Check with engine builder for maximum recommended safe shift point before setting shift point on tachometer. Failure to do this could lead to over-revving of engine, causing serious damage to engine and car.
IMPORTANT NOTE: This tach has an air core meter movement. The tach pointer may not always rest at zero. This is normal. When 12v power is supplied, pointer will position to the correct RPM.

Mounting (Shift-Lite model shown)
1) Loosen both bolts holding the shock strap to the mounting foot. Back both bolts out until each is only one or two turns into the spacer.
2) Pass tach wires through shock strap assembly and slide tach casing into shock strap assembly.
3) Position Shift-Lite mounting bracket under shock strap as shown in image. Adjust Shift-Lite tach, and mounting base to desired positions (see figure 4 for recommended shock strap position), and tighten bolts holding mounting foot to shock strap to secure the assembly.
4) Make sure rubber section of shock strap seats properly to ensure a proper fit. Check to make sure shock strap is approximately 17⁄8" (1.875”) between center line of strap and step of tachometer casing for best mounting. For external Shift-Lite models, plug shift light into tachometer connector. Plug is directional, do not force fit!
5) Recommended placement of external Shift-Lite is at 10 o’clock position. It is possible to place Shift-Lite in other positions in accordance with driver preference and vehicle mounting requirements.
6) The special design of the tachometer base allows for a variety of mounting possibilities. Attach the base using screws provided or use a pop rivet tool.

TACHOMETER
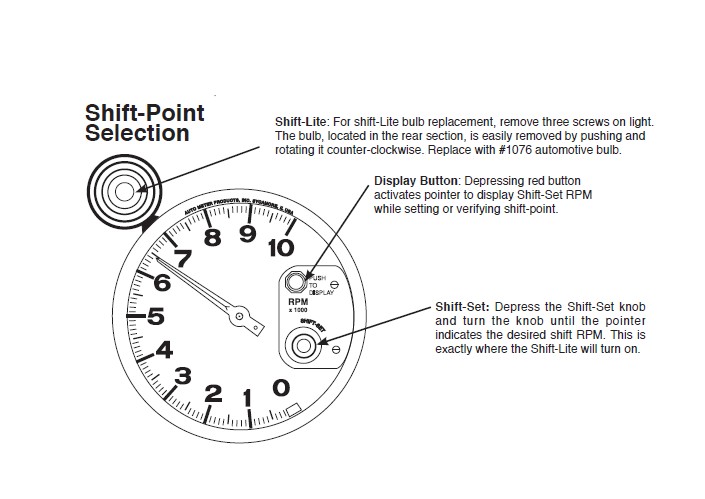
1. Push and hold red button. Pointer will display the tachometer’s shift-point and the Shift Lite will activate.
2. To set your desired shift-point, continue depressing the red button, then push and turn the Shift-Set knob until the pointer reaches the desired RPM.
3. To double check, push red set button-- pointer will indicate your shift-point.
4. During normal tachometer operation, the Shift-lite will activate at the exact same RPM that the pointer indicates when red set button is depressed.
Installation Tips
1. Mount tach base firmly to reduce vibration, wear and tear.
2. Avoid contact of the tach with windshield or other objects to maintain rubber shock absorbing feature.
3. A 12 V power source MUST be used to power this tachometer. A 12 V motorcycle battery is a good alternative for cars without batteries. A battery with minimum 5 amp hour rating is recommended.
4. Avoid connecting tach power and ignition power leads together. Use separate battery leads for ignition and tach to avoid excess voltage drop.
5. Wherever possible, solder wire connections and avoid crimp-type connectors. This will minimize loose connections that could cause problems later.
6. Make sure you have a good ground to engine and battery negative terminal.
7. Wire installations should be neat and tied down to prevent tugging and fraying of wires at connections.
Trouble Shooting
If your tach does not function properly after installation check the following:
1 Are all electrical connections correct and tight?
2 If neither tach nor dial light work, check ground and 12V power connections.
3. Disregard tach readings that occur before engine is started.
4. If problems persist try tach on another vehicle with the same ignition.
5. For changes in ignition type, contact a service representative from Auto Meter.
6. Ignition manufacturers recommend that the ignition and coil be matched according to criteria which they establish (often that the ignition and coil be products of the same company). If they are mismatched, minor malfunctions may occur, showing as erratic readings on the tach. Mismatching coil and ignition types is often the cause of incorrect tach performance.