 FREE 1 to 3-Day Delivery on Orders $149+ Details
How to Install Mopar 3-3/8 in. Speedometer - Electrical - Black on your Ram
General Information
This electric speedometer utilizes a LCD to display odometer and trip odometer mileage. Momentarily pressing of the Trip/Reset button on the dial window toggles the odometer/trip odometer information displayed on the LCD. Pressing the button, while in trip mode, for more than two seconds will reset the trip odometer. The odometer cannot be reset.
(Speedometers are pre-calibrated for 16 pulse/revolution sender. Speedometers that include a 2 wire sender are pre-calibrated to 8 pulse/revolution to match sender. See Speedo Senders below for available Auto Meter Senders.) The speedometer should be calibrated to ensure accurate operation after installation.
NOTE: The odometer on this speedometer will read from 1 to 5 miles. This is done during factory testing to insure optimum quality.
Speedometer Senders
The speedometer is designed to operate with an electrical speed sender. The speed senders signal pulse range must be between 500 and 400,000 pulses/mile. Any speed sender or electronic module that meets the following two conditions can be used:
• Pulse range generated proportional to the vehicle speed
• Output within the voltage ranges listed below:
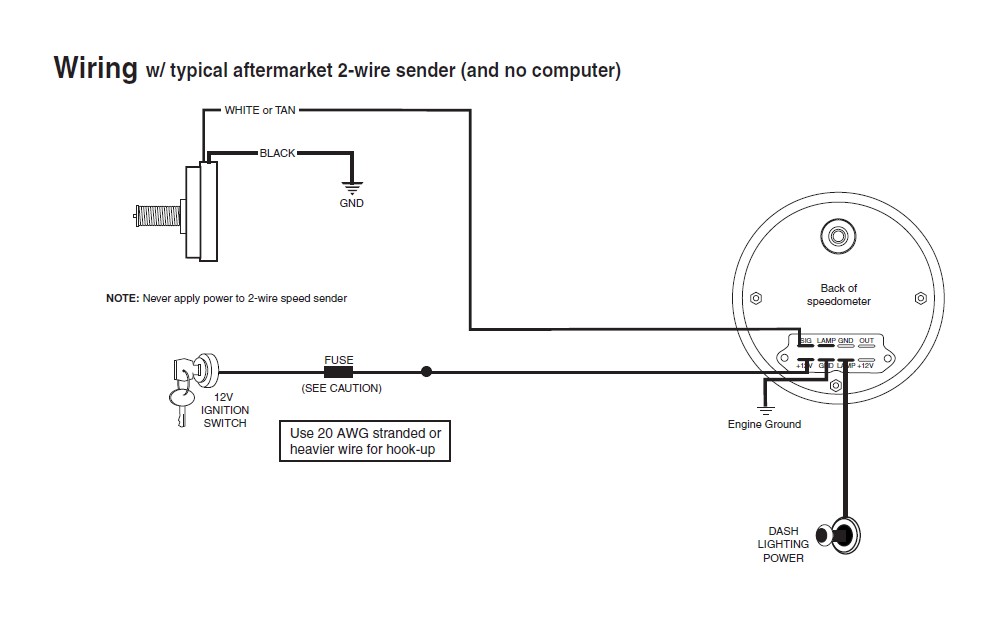
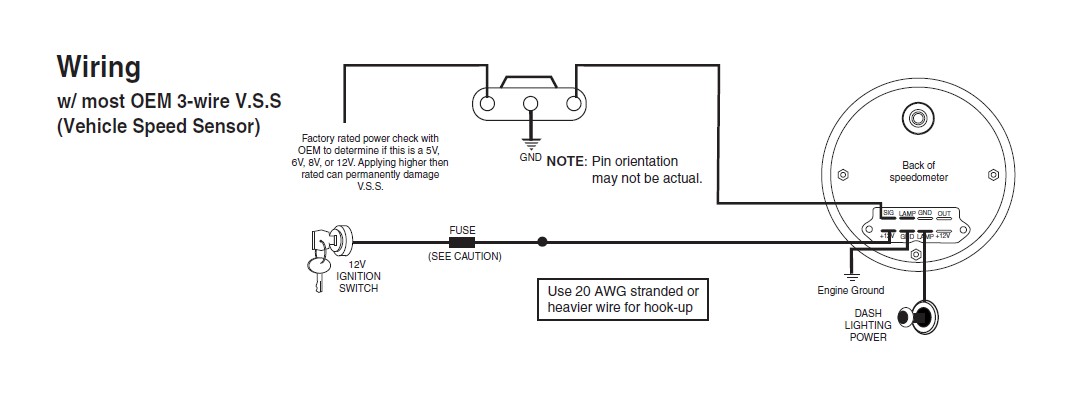
2.0 to 16V peak (Square Wave), 3 wire
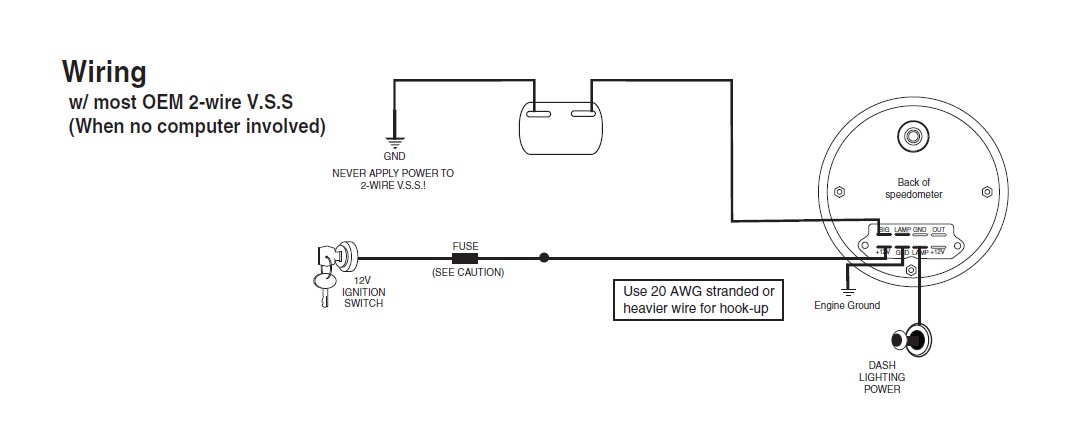
2.0 to 120V peak to peak (Sine Wave), 2 wire
Recommended Auto Meter Hall-Effect (Square Wave), 3 wire, 16 Pulses Per Revolution senders:
5291 Standard 7/8-18 thread
5292 Ford, plug in
NOTE: All Auto Meter programmable speedometers are also compatible with the 5289 GPS module.
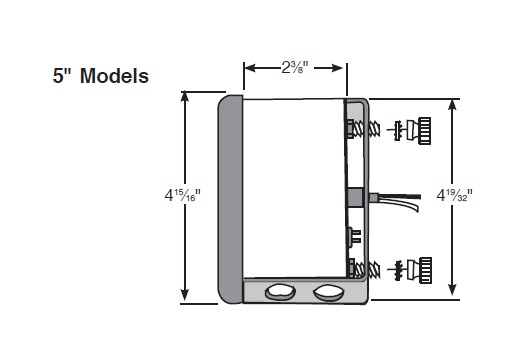
Mounting
1. Mount a 33⁄8" speedometer in a 33⁄8" dia. hole and a 5" speedometer in a 45⁄8" dia. hole in the dashboard. (be careful not to make the hole too large.)
2. Cut a 3⁄8" dia. hole in the firewall for the speedometer wires. Place a rubber grommet in the hole and route the connector wires through the grommet to the engine compartment.
3. Connect the speedometer wires as shown in the wiring section.
4. Secure the speedometer to the dashboard using the provided bracket, and hardware. .
Note: With the ignition switch off, the speedometer pointer may not always rest at zero. This is normal. When engine is started, the pointer will first move to half scale then will rest at zero.
WARNING: Incorrect hookup will damage the speedometer and void warranty. Please read these instructions carefully.
CAUTION! As a safety precaution, the power wire to this product should be fused before connecting it to the 12 VDC power source. We recommend using a 3 Amp automotive fuse inline with the power wire to our product.
Once the speedometer is mounted and wired into the vehicle, the speedometer should be tested to verify the electrical connections are working properly. First, watch the speedometer’s pointer as the power is applied. The pointer should first move to a midrange position, then down to the zero box on the dial. This action verifies that power is properly connected to the speedometer. The vehicle should be driven some distance to verify the Vehicles Speed Sender (VSS) is connected properly, and that the pointer moves. If the pointer does not move off the zero box, verify the VSS is connected properly.

Calibration
To calibrate your electronic speedometer:
1) With the power off, push and hold the calibration button (trip/reset button when equipped). While holding the button, start the vehicle and continue to hold the button until the pointer sweeps to full scale and stays at full scale. You may now release the button.
2) Drive to the beginning of a pre-marked 2 mile distance and come to a stop. It does not matter how far away it is to get to this pre-marked 2 mile distance. Do NOT shut the engine off. Push and release the button. The pointer will drop to half scale.
3) Drive the 2 mile distance. The pointer will remain at the half scale mark no matter what speed you drive. If the speedometer has a LCD display odometer, it will be normal to see it counting rapidly as it is receiving a speed signal. If you have to stop during the calibration, that is o.k. The speedometer is simply counting pulses during this time.
4) At the end of the 2 mile distance, come to a complete stop and push and release the button. The pointer will drop to 0 and the calibration is stored.
You are now finished with calibrating.
Remember the accuracy of your 2 mile distance will directly affect the accuracy of your speedometer.


SERVICE
For service send your product to Auto Meter in a well packed shipping carton. Please include a note explaining what the problem is along with your phone number. If you are sending product back for Warranty adjustment, you must include a copy (or original) of your sales receipt from the place of purchase.


