FREE 1 to 3-Day Delivery on Orders $149+ Details
How to Install Flowmaster Outlaw Cat-Back Exhaust - Split Side/Rear Exit (09-17 4.7L RAM 1500) on your Dodge RAM

Shop Parts in this Guide
Removal:
1) Raise the vehicle up on a hoist or rack to working height. If you do not have access to a hoist or rack raise the vehicle and support securely with jack stands.
2) For factory single and dual tailpipe vehicles: To make removal of the stock system easier, you may choose to cut the stock passenger side tailpipe off where it exits the muffler. This can be done using a hacksaw or sawzall. This step is not mandatory, but makes removal easier. After cutting, remove the hanger at the rear of the tailpipe from the rubber mount/mounts on the vehicle and set aside. For factory dual tailpipe vehicles: After cutting or unclamping the drivers’ side tailpipe, remove the two hangers on the pipe from the rubber mounts on the vehicle and lower from the vehicle.
3) Support the muffler with a stand and remove the two hangers at the rear of the muffler along with the hangers in front of the muffler from the rubber mounts on the vehicle. Then remove the clamp on the slip connection just behind the factory Y-pipe. After removing the clamp, this connection will have to be either sliced or heated in order to separate the connection. Remove the muffler and set aside.
Installation:
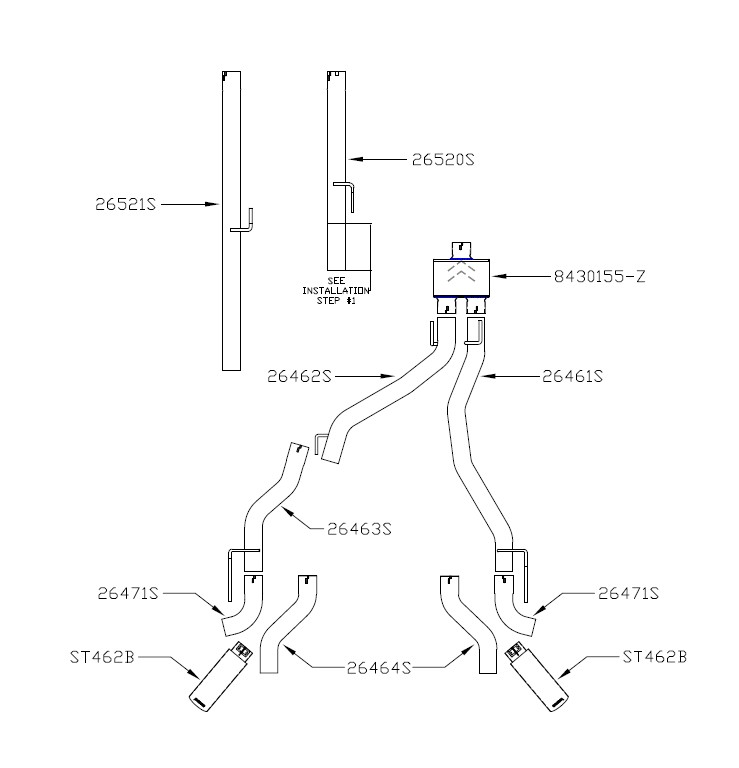
1) Trim the back end of inlet pipe #26520S according to the measurements below before installation. After trimming, place a supplied clamp onto the expanded end of the pipe and place onto the back of the factory Y-pipe. Line up the notch in the adapter pipe with the tab on factory Y-pipe. Connect the hanger on the pipe to the rubber mount on the vehicle. Tighten the clamp enough to hold. Regular Cab, 8’ Bed, Quad Cab, 6’-4” Bed and Crew Cab, 5’-7” Bed Models: Trim 8.00” from the back of inlet pipe 26520S. Crew Cab, 6’-4” Bed Models: No trim required on inlet pipe 26520S.
2) Place a supplied clamp onto the expanded end of inlet pipe #26521S and slide onto the back of the 26520S front pipe. Connect the hanger to the rubber mount on the vehicle and tighten the clamp enough to hold. Place a supplied clamp onto the inlet of muffler #8430155-Z and slide onto the back of the inlet pipe. Use a stand to temporarily support the muffler and tighten the clamp on the muffler inlet enough to hold.
3) Place a supplied clamp onto both muffler outlets. Place the right side tailpipe #26461S into position over the rear axle and into the right side muffler outlet. Connect the hangers at the front and rear of the pipe to the rubber mounts on the vehicle. Tighten the clamp enough to hold, but still allow for adjustment.
4) At the rear of the frame on the drivers side of the vehicle (next to the spare tire) there is a pair of hanger mounts welded to the bottom of the frame. Place the supplied HA168 rubber hanger onto the inner hanger of this pair.
5) Place the front section of the left side tailpipe #26462S into the left side muffler outlet and connect the hanger on the front of the pipe to the rubber mount on the vehicle. The rear hanger on this pipe will only be used if the truck was originally equipped with dual tailpipes. Tighten the clamp on the muffler outlet enough to hold, but still allow for adjustment.
6) Place a supplied clamp onto the expanded end of the rear section of the left side tailpipe #26463S, place onto the back of the front section by sliding the two sections together at the slip-fit connection over the rear axle. Place the hanger at the rear of the tailpipe into the rubber mount installed in step 4 above. Tighten the clamp enough to hold, but still allow for adjustment.
7) Slide either the side exit pipe #26471S or the rear exit pipe #26464S onto the ends of both over-axle pipes. Note: For trucks originally equipped with a single tailpipe, 1.00” must be trimmed from the back of rear exit pipes #26464S. Place a 3" clamp onto these slip-fit connections. Tighten enough to hold, but still allow for adjustment. Place the two stainless tips #ST462B onto the exit pipes and tighten the clamps enough to hold, but still allow for adjustment. Rotate the exit pipe and tip to the desired distance from the fender or bumper and so angle cut on tips are in the desired location.
Adjust the position of all pipes and muffler to provide a satisfactory fit. A minimum 3/4” clearance around all parts of the system must be maintained; while also keeping suspension travel and vibration in mind.
Tighten all clamped connections down securely. Slide the 7/16” hanger keepers onto the end of the hangers at the rear of the vehicle on the driver’s side to prevent the hangers from slipping out of the rubber mounts. Also, use the two included zip-ties to tie back the rear end breather tube and other cables out of the way to provide clearance for the left side tailpipe, be sure to leave enough slack for suspension travel.
For a more secure installation, we recommend welding all slip-fit connections.
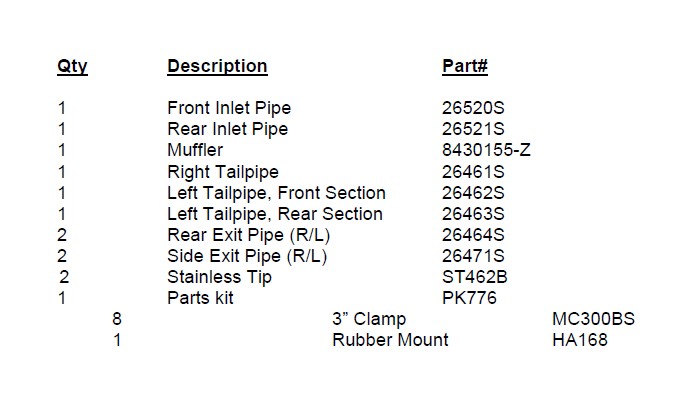
PACKING LIST