 FREE 1 to 3-Day Delivery on Orders $149+ Details
How to Install PIAA 520 Series 6 in. Round Ion Yellow Halogen Lights - Fog Beam - Pair on your Ram
Installation Time
1 hours
Tools Required
- Vinyl electrical tape
- Diagonal cutters
- Pliers
- Phillips driver (medium)
- 17mm Wrench
WARNING
• Lighting laws vary state to state, check your local laws before use.
• The lamps get very hot when they have been in use. Do not touch them as they may cause burns.
• After the lights have been on do not place them near flammable objects.
• Do not splash water directly on the hot lamps, as this may cause cracking of the lens due to dramatic change in temperature.
• Do not look directly into the light of the lamps as the bright light may cause eye damage.
• The lamps and relay harness are to be used only with 12 volt automotive electrical systems.
• Using this light system while the engine is not running will drain the battery.
• Do not repeatedly turn the light system on and off as it will shorten the life of the system.
• Some automobiles generate high voltage at start up and when it is turned off, do not have lights on as you start or turn off your vehicle.
• Using the wrong bulbs may cause a malfunction, use only specified PIAA bulbs.
• When changing bulbs or lenses follow the lamp assembly/disassembly diagram.
• Leave at least 1/8” clearance between the lamps and the front spoiler, as the heat may damage the spoiler.
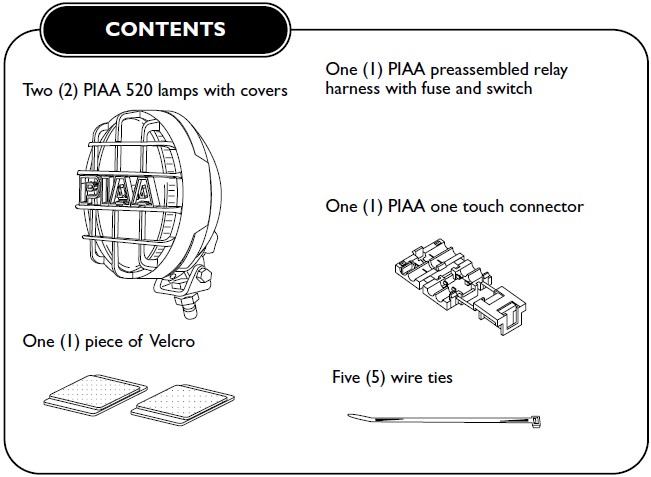

LAMP INSTALLATION
• The work site must be clean and level with enough working space to complete the job without distractions.
• When mounting the lamps mount them in such a place that they are free of obstructions. Do not mount the lamps in such a place that they will obstruct an existing automotive function. Do not mount them in such a manner that they have a chance of contacting the road or curbs.
• The PIAA 520 may be mounted upright or hanging down. It is very important to make sure the "PIAA" that is molded into the lens reads right side up. If it will not read right side up in its mounting location then the lens and reflector unit will have to be removed and repositioned in the lamp so that "PIAA" will read right side up. (See Lamp Service Section)
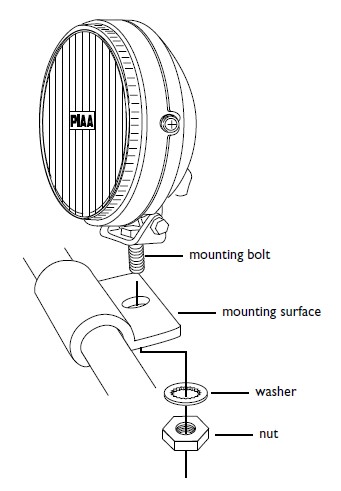
• When a mounting location is decided upon mount the lamp with the supplied mounting hardware.
• When lamp is mounted make sure to leave 1/8" clearance around the lamp for proper heat dissipation and to protect painted surfaces from heat damage.
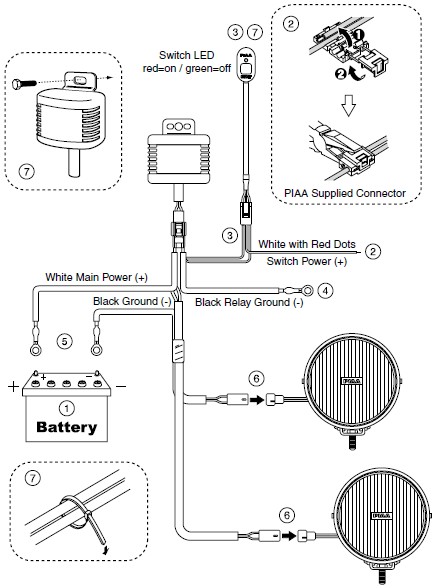
HARNESS INSTALLATION
When connecting the wires on the harness, follow the wiring diagram and the sequence below.
1. Before connecting any wires disconnect the negative (-) battery terminal.
Note: When running the wires through the engine compartment sure to keep them securely away from moving parts such as the fan and the throttle cable and away from hot parts such as the exhaust manifold.
2. Find a power source to connect the switch power wire to. For legal operation of fog lights the power source must be one that is only powered ( ) when the low beam of the headlamps is on. For legal operation of driving lights, the power source must be one that is only powered when the high beam of the headlamps is on. To make this connection use the supplied connector or any connector that is suitable for this application. Do not connect lights to turn signals or to lights that flash with an automotive alarm.
3. Run switch wires into driver's compartment. If wires pass through the fire wall a rubber grommet must be used. Connect switch to switch wires and mount switch in desired location.
4. Connect relay ground to chassey or battery negative (-).
5. For proper lamp operation it is recommended that you connect the positive ( ) and negative (-) power supply wires directly to the corresponding battery terminals. Do not take power directly from the alternator.
6. Connect harness to lamps.
7. When the wiring is complete, test the system for operation. Do this by turning on the system. If the system works, securely fasten the relay boxes and fuse holders or tie them out of the way with wire ties. If the system does not come on, please contact your PIAA dealer for assistance.
8. Aim lamps according to Light Aiming instructions on page 5.
9. Tighten all fasteners.
WIRING DIAGRAM
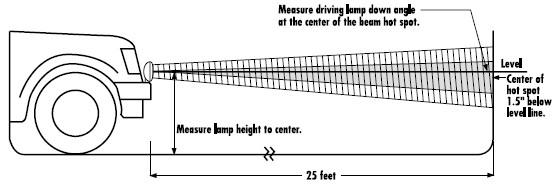
DRIVING LIGHT AIMING
Typically, driving lights are mounted above the front bumper about 14-30 inches from the ground to provide extra high beam illumination. Driving lights can be mounted below the bumper, although they will not be as effective because the light will hit the ground sooner and reduce the range of the light.
Visual aim is made with the center of the beam hot spot 1.5 inches below the lamp center at 25 feet with the lamp facing straight forward. (see below.)
CAUTION:
Do not use driving lights into oncoming traffic.
Driving lights should never be the only foreword light source.
Driving lights should only be used with the headlamp high beams.
FOG LIGHT AIMING
There are two important issues to address when installing fog lights, the first is to minimize the amount of return glare into the drivers eyes, and the other is to minimize glare into oncoming eyes. Both of those issues must be accomplished while putting as much light as possible on the road.
These fog/foul weather light aiming instructions are suggestions taken from common practice and the S.A.E. standard J583. Some modifications to these instructions may be necessary to minimize glare.
Visual aim is made with the top of the beam 4 inches below the lamp center at 25 feet with the lamp facing straight forward. (See below.)
CAUTION:
Only use fog lights if they are aimed properly.
Fog lights should never be the only foreword light source.
Fog lights should be used with headlamp low beams.

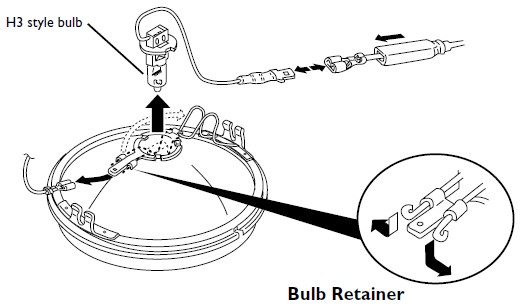
LAMP SERVICE
The PIAA 520 lamps have replaceable H3 style bulbs.
Loosen the two lamp screws, do not remove them. When the screws are loose
enough, slide the lens and reflector unit from the housing.
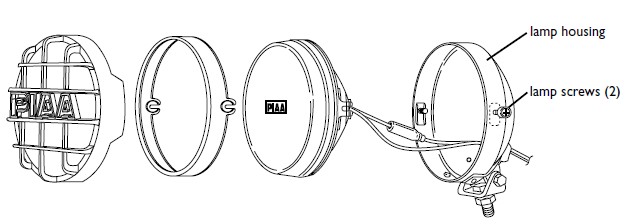
When service is complete reverse steps to assemble lamp.
Make sure to not pinch wire while assembling.


