FREE 1 to 3-Day Delivery on Orders $149+ Details
How to Install Curt Manufacturing 7 ft. 5th Wheel/Gooseneck Custom Wiring Harness w/ 7-Way Connector on your Sierra

Shop Parts in this Guide
INSTALLATION / SAFETY INSTRUCTIONS
Step 1: Locate vehicle battery on the driver side under the hood and disconnect the negative battery terminal.
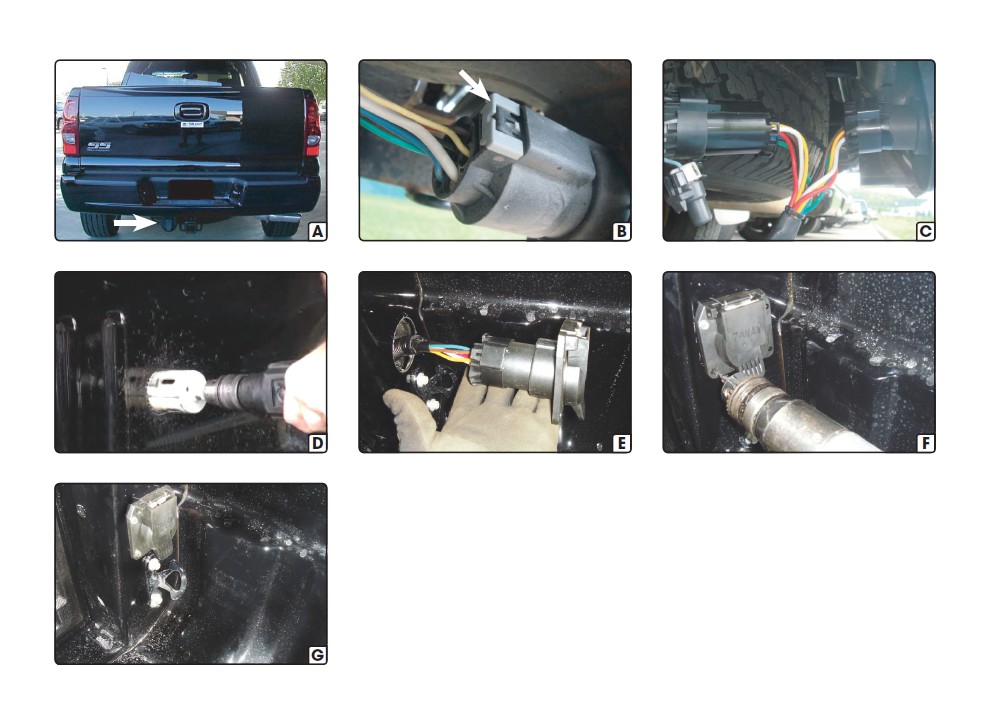
Step 2: Locate the vehicle taillight wiring harness connector. It will be connected to the vehicle 7-way trailer connector, mounted to the hitch or bumper at the rear of the vehicle (A). The connector will be similar to that on the CURT wiring harness extension.
Seperate the 7-way connector from the vehicle wiring harness by carefully releasing the gray locking clip and gently pulling the connector apart while holding down on the connector locking latch (B).
Step 3: Position the paired extension harness ends between the separated connectors. Insert the longer of the paired connectors into the vehicle wiring harness connector. Make sure the connectors are fully inserted with locking tabs in place.
Insert the shorter of the paired connectors into rear of the factory 7-way socket. Make sure the connectors are fully inserted with locking tabs in place. Return the locking clip to it's original position (C).
Step 4: Locate a suitable mounting point on the driver's side between the rear post and the wheel well and route the harness to this location.
Note: Be sure the harness will not pinch or bind when turning.
WARNING: Check for miscellaneous items that may be hidden behind or under any surface before drilling to avoid damage and / or personal injury.
Step 5: Using a hole saw, drill a 2 1/8" hole in the desired location in the sidewall (D). Using a file, smooth the edges of the hole to prevent abrasion of the harness or connector.
Step 6: Route the extension harness connector up from under the body through the hole drilled in step 5. Insert the harness connector into the rear of the provided 7-way socket, Make sure the connectors are fully inserted with locking tabs in place (E).
Step 7: Position the 7-way connector into the opening. Using the connector as a template, drill four 7/64" mounting screw holes (F).
Step 8: Secure the connector to the vehicle using the provided self-tapping screws (G).
Step 9: Test for proper function by using a test light or connecting a properly wired trailer. Secure the extension harness cable to the vehicle using the cable ties provided.
Step 10: Reconnect negative battery terminal.