FREE 2 or 3-Day Delivery on Orders $119+ Details

Talk to a Ram 1500 Enthusiast
1-888-706-1096
M-F 8:30A-11P, Sat-Sun 8:30A-9P
Win $4,000! Enter Daily

Barricade Extreme HD Rear Bumper (19-23 RAM 1500)

Item R109858
Call a Ram 1500 Enthusiast at 1-888-706-1096
M-F 8:30A-11P, Sat-Sun 8:30A-9P
$0.00
Our Price

$689.99 (pair)

FREE Shipping + $25.00 Oversized Item Fee Market Price $806.99 You Save 14% ($117.00)

Open Box from $413.99

Will this fit your Vehicle?

Select a different vehicle Help?
Update or Change Vehicle
Ship to: Ashburn - 20149
Sorry, please enter a valid US or CA postal code
We're sorry, zip can't be updated at this time.
Recommended Install Shops
How It Works
Install Shops are available near Ashburn - 20149

Add Local Shop Installation

Total cost of service $429.00
    Create a list
    Add to New List

    Saved - View your saved items

    We're sorry. We couldn't save this product at this time.

    or use

    Buy 2 or more Barricade items of $500+, Get $50!

      Video Review & Installation

      Hey, guys, Sara for americantrucks.com, and today we have a review and install of the Barricade Extreme HD rear bumper, fitting your 2019 and newer Ram 1500s, excluding the Classic models. Protect your investment and introduce some rugged styling with this Barricade bumper. This bumper is compatible with factory components, including the backup sensors and hitch plug. Coming in at around $600, this is a middle-of-the-road option price-wise, but if you were looking to add some stylish protection to your truck without losing function, this is an excellent option. I'm giving this install a two out of three wrenches on the difficultly meter, it can be done in approximately two hours. Some minor wiring is required, but otherwise, it's a fairly simple installation. With that said, let's jump right into our install.For this install we used a pop clip removal tool, a set of cutters, wire crimping and stripping tool, flathead screwdriver, 18 and 16-millimeter sockets, an impact gun, and a heat gun.All right. So, we have our truck up on the lift just to give you guys a better look at what's going on underneath. If you don't have a lift, you definitely don't need one to get this done. But either way, the first step in our install is to unclip the wiring harness connection that's under the driver side of your truck. So, to release this clip, first you're gonna push back on this yellow tab. You can do this by hand, but if you do it gently with a flathead, that works as well. Once you've done that, you can just grab the red part of this clip and pull out, and it should free itself by pulling back on the gray part, and your clip is free. Next up, you will have to free your wiring harness from these clips that are attached to your hitch. Just get behind them with a trim removal tool or pop clip removal tool, and prying out should get them to free themselves up. There is a second one a little higher up.Next up, on the same side of your truck, you're going to remove the two 16-millimeter nuts holding your bumper onto your frame. And we're gonna do the same thing to the two nuts on the other side, grabbing your 16-millimeter socket and removing them. So, once the hardware is removed from underneath your bumper, you will want to support it at this point, because these are the last two bolts coming out. These are located behind your license plate. So if you have not already, remove your license plate and you will see the two final bolts. Grab your 16-millimeter socket and get these removed. Now you can grab a friend at this point, and pull your bumper off your truck.All right. So, now that we have our factory bumper off of our truck, we can put it side by side with our Barricade bumper, and really check out some of the similarities and differences. Now, right off the bat, you may have noticed that design-wise the factory bumper and our Barricade bumper are complete opposites. If you're not so much into the chrome appearance, or if you're looking for a more aggressive appearance to your truck, the black powder coat of this Barricade bumper is really gonna get the job done there. You may also have noticed that your factory bumper is mostly plastic, this Barricade bumper is made of 3-millimeter thick steel. So, if you're looking for more protection for the back of your truck, this is also gonna get the job done there. Some added features that are super nice on this, is these step inserts on each side of your bumper, it's a nice added feature to have there if you'd like access to bed easier. Also, there are lighting inserts for the addition of lighting down the road. But either way, if you're looking for a very aggressive bumper option, this Barricade bumper is the one for you. All right. So with that said let's grab our Barricade bumper and get it installed on our truck.All right. So, the first step in our install is that we will have to transfer some of the components from our factory bumper over to our new bumper. We're gonna start with disconnecting the hitch connector on the backside here so we can get our trailer hitch plug out. Pinching the tab on the side of the connector, pull this part off, and now you can pinch either side of these here, or use a flathead to gently pry away on both sides, and it should release from the bumper. Unplug each side of the license plate lights. Finally, remove each of the Christmas tree clips holding the wiring harness to the bumper. Using your trim removal tool, just pry back, gently, try not to break these, and they should come out.All right. So, now that we have all of our components removed from our factory bumper, we can prep our new bumper to go on our truck. First up, we're gonna grab these sensor plugs, and we're gonna be plugging the holes because our bumper does not have sensors on them, for our truck, at least. If you do have sensors on your truck, this would be the point where you install them into your new bumper. Pressing down on your plug with the tabs to each side, make sure it seats fully in your bumper.Now we can reinstall our trailer plug. Going from the back of the bumper, as long as it's lined up with the cutout, just press upwards, and it's into clipped into place. Now we can reinstall our wiring harness. First, plug back in your hitch connector, and now you can run your wiring harness the length of the bumper, tucking it away as you see fit, just make sure it does not dangle after your bumper is installed. We are gonna use this connector to wire in our license plate light, so leave this one within realm of this hole here. Now we can grab our light and get it installed.Now we can install our license plate light into our bumper. You wanna be sure the light portion of this is facing in towards your license plate area, this will be opposite once it's installed in the bumper. Grab your wiring and tuck it through the hole, and then pop your license plate light into place. All right. Now, we can wire in our license plate light to our existing license plate light pigtail. We've already peeled back some of the electrical covering here, you will need to do so to expose a good portion of the positive and negative wire.So, we've cut our connector wiring down about halfway through so that we can wire it back together and splice in our license plate light. Now, we can grab the ends of these and strip them using a stripper. So, now that all our wires are stripped, we can now twist together both of our ground wires and get it into this spade connector. I wanna use the one that is the female side on this, because it will be the one that's on our truck if we ever need to disconnect this. With our connector in place, we can now grab our crimper and crimp this down. Once we've crimped our connector, you just wanna make sure that it's a nice tight seal in there, and it is, let's get our power wires together. Joining them, and ensure we get a nice, tight twist together. Slide them into our connector, grab our crimpers, and crimp them down.With our spade connectors finished on the pigtail for our wiring harness, we can now get the male side spade connectors on our license plate light. Ensuring that the wire is twisted nice and tight, insert it into your connector, make sure it goes through all the way, and then crimp it. Just double check that it doesn't pull out, and move on to your ground wire. Now we can heat shrink all of these. Now we can plug in our connectors, ensure that you're plugging the ground wire into the ground wire on our pigtail, and the power wire to the blue and white striped wire on our pigtail. Once your connectors are all together, I recommend just cleaning this up a little bit with electrical tape, just so you have no exposed wire.So, the final step in prep before the bumper goes on our truck, is to push in these license plate clips into the provided holes here. Now, let's grab our bumper and get it on the truck. Might be helpful to grab a friend at this point to help you get the bumper situated on your truck. There are two pegs that, sort of, hold it in place, but you may wanna support this, especially if you're doing this by yourself. Then you're gonna grab the provided flat bracket and slide it behind the bracket on your bumper. Once you have that in place, grab at least one bolt and get it threaded into the provided welded nut. Grab the smaller bracket with the welded nuts and slide it behind the bracket on your bumper until it lines up with the frame of the truck. Slide the provided bolt through the hole and thread it into the nut on the backside. Once both your bolts are in, grab your 18-millimeter socket and tighten them down.Final step in our install is to plug back in our harness connector. Make sure it's firmly seated in there, press in the red part, and then, finally, the yellow clip. We can also plug back in our Christmas tree connectors holding in our wiring harness to our frame. And make sure the rest of the harness is neatly tucked away. All right. So, once you're happy with the placement of your bumper in line on your truck, tighten down the bolts on the other side. And once that's complete, that's gonna do it for our review and install. For all things Ram, keep it at americantrucks.com.

      Product Information

      Features, Description, Reviews, Q&A, Specs & Installation

      Features & Specs

      • Extreme HD Rear Bumper
      • Protects Truck’s Rear End
      • Introduces Rugged Styling
      • Compatible with Factory Backup Sensors
      • Heavy-Duty, 3mm, Steel Construction
      • Two-Stage, Black, Powder-Coat Finish
      • Medium-Level, Bolt-On Installation
      • Installing Hardware Included
      • Fits the 2019-2023 RAM 1500
      • Does Not Fit 2019+ RAM 1500 Classic Models

      Description

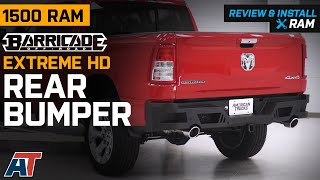
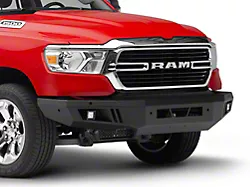
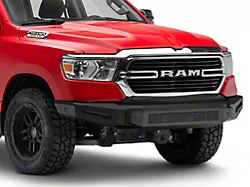
      Protects Truck’s Rear End. Ready for something to absorb the abuse that the rear end of your RAM 1500 takes? With the Barricade Extreme HD Rear Bumper, you will get just that. The truck’s rear end will be safe from road and trail hazards, while making the vehicle as a whole look a little more rugged. It even accommodates any rear sensors that you may have for your backup system.

      Tough, Rigid Steel Construction. This rear bumper is made from a heavy-duty, 3mm steel plate to enforce its toughness and rigidity. And it is finished with a 2-stage, black, powder coat to optimize its level of corrosion resistance.

      Medium-Level Bolt-On Installation. This rear bumper bolts onto the factory mounting areas, and it comes with all the components necessary to complete installation within 2 hours.

      Application. The Barricade Extreme HD Rear Bumper is designed to fit the 2019-2023 RAM 1500. Does not fit RAM 1500 Classic models. It is sold individually. This Rear Bumper is designed to work with models that are equipped with or without rear mounted backup sensors.

      Barricade Off-Road

      Shop All Truck Parts And Accessories

      Shop All Truck Bumpers

      Shop All Rear Truck Bumpers

      Fitment:

      Barricade R109858

      CA Residents: WARNING: Cancer and Reproductive Harm - www.P65Warnings.ca.gov

      Installation & What's in the Box

      Installation Info

      What's in the Box

      • (1) Rear Bumper
      • (2) Mounting Brackets
      • (4) Sensor Hole Plugs
      • Installation Hardware
      4.5

      Customer Reviews (500+)

        Questions & Answers

        10 More Questions