FREE 1 to 3-Day Delivery on Orders $149+ Details
How to Install Barricade 3 in. Bull Bar - Stainless Steel on your Ram
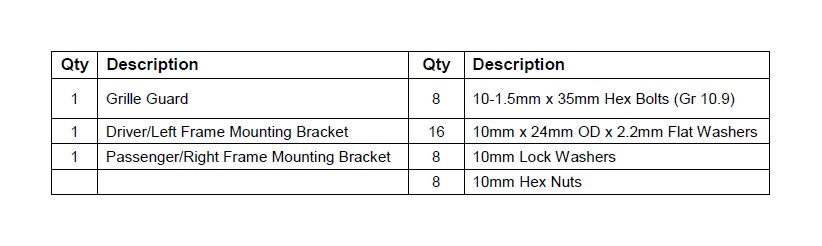
PARTS LIST:

PROCEDURE:
1. REMOVE CONTENTS FROM BOX. VERIFY ALL PARTS ARE PRESENT. READ INSTRUCTIONS CAREFULLY BEFORE STARTING INSTALLATION. ASSISTANCE IS RECOMMENDED. FACTORY TOW HOOKS, (IF EQUIPPED), CANNOT BE RE-INSTALLED. CUTTING MAY BE REQUIRED.
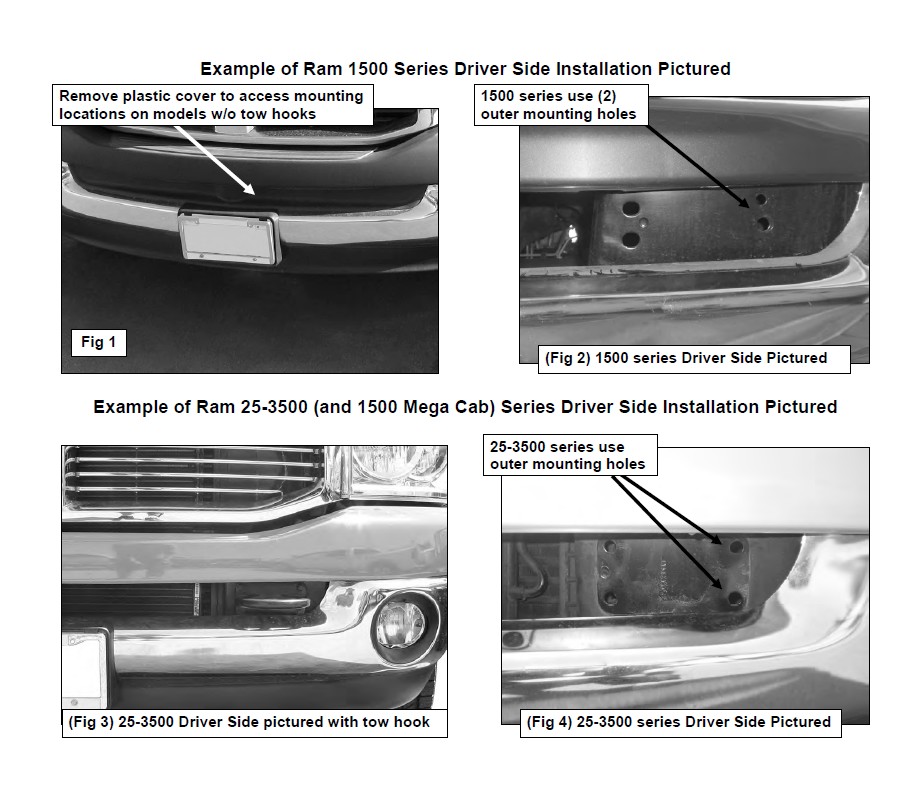
2. Remove the tow hooks if equipped. On models without tow hooks, remove the plastic insert in the center of the bumper below the grill, (Figure 1).
3. Determine the correct installation for your application:
1500 Models, (excludes 1500 Mega Cab).
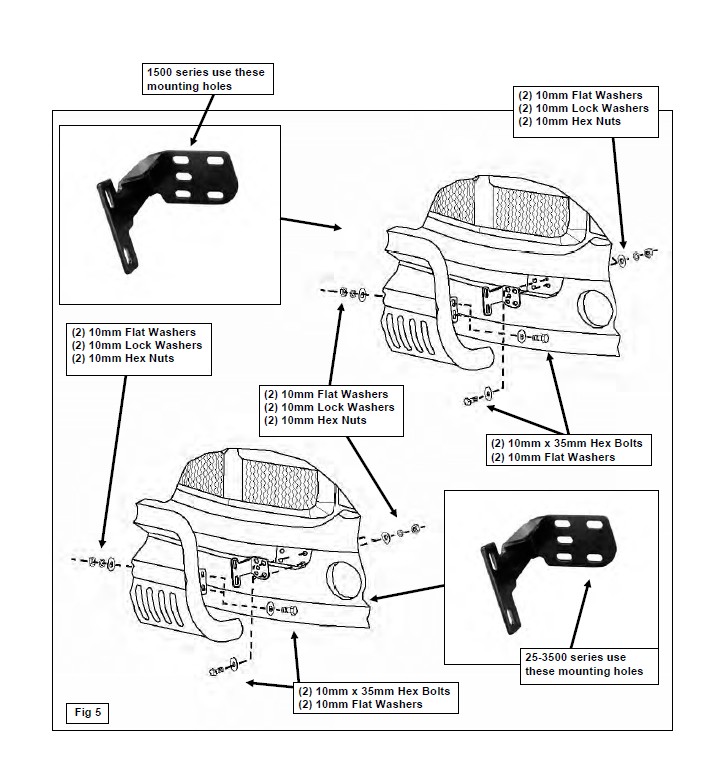
Select the driver side Frame Mounting Bracket. Line up the inner center and top mounting holes in the Bracket with the outer two mounting holes on the mounting plate on the end of the frame behind the bumper, (Figure 2). Bolt the Bracket to the frame with (2) 10mm x 35mm Hex Bolts, (4) 10mm Flat Washers, (2) 10mm Lock Washers and (2) 10mm Hex Nuts, (Figure 5). NOTE: Access the back of the mounting location from behind the bumper bracket.
25-3500 Models, (including 1500 Mega Cab).
Select the driver side Frame Bracket. Re-use the factory tow hook hardware, (Figure 3), or use the supplied 10mm hardware as previously described, to bolt the Bracket to the mounting plate. Use the (2) outer holes in the Frame Mounting Bracket and the outer tow hook holes in the mounting plate on the frame, (Figures 4 & 5).
4. Repeat Step 3 to install the passenger side Frame Mounting Bracket.
5. With assistance, lift the Bull Bar up to the outside of the Brackets. Bolt the Bull Bar to the Brackets with the included (4) 10mm x 35mm Hex Bolts, (8) 10mm Flat Washers, (4) 10mm Lock Washers and (4) 10mm Hex Nuts, (Figure 5). Do not fully tighten hardware at this time.
6. Stand back from the vehicle and check to see that the Bull Bar is centered and level on the vehicle and adjust as necessary. IMPORTANT: Once properly aligned, tighten all hardware.
7. Do periodic inspections of the installation to make sure that all hardware is secure and tight.
8. Optional: If the vehicle was not equipped with tow hooks, the plastic cover described in Step 2, (Figure 1), may be reinstalled once the Bull Bar is properly adjusted. Trim equal amounts from each end until the cover fits between the Frame Mounting Brackets. Line up the mounting holes and secure the cover with the factory clips and hardware.
To protect your investment, wax this product after installing. Regular waxing is recommended to add a protective layer over the finish. Do not use any type of polish or wax that may contain abrasives that could damage the finish.
For stainless steel: Aluminum polish may be used to polish small scratches and scuffs on the finish. Mild soap may be used also to clean the Bull Bar.
For gloss black finishes: Mild soap may be used to clean the Bull Bar.