FREE 1 to 3-Day Delivery on Orders $149+ Details
How to Install Flowmaster American Thunder Cat-Back Exhaust - Split Side/Rear Exit (98-03 4.6L) on your Ford F-150

Shop Parts in this Guide
Removal:
1) Using a hacksaw or sawsall, cut the stock tailpipe off where it exits the muffler. (This step is not mandatory, but will make removal easier.)
3) Separate the three rubber hangers on the muffler and tailpipe from their rubber mounts on the vehicle. Remove the tailpipe and set aside.
4) Support the muffler with a stand. Remove the clamp at the connection just behind where the two converter pipes merge together. Because this connection may be significantly crimped by the clamp, it may be necessary to heat or slice open this connection for ease of removal.
5) Remove the muffler and set aside.
Installation:
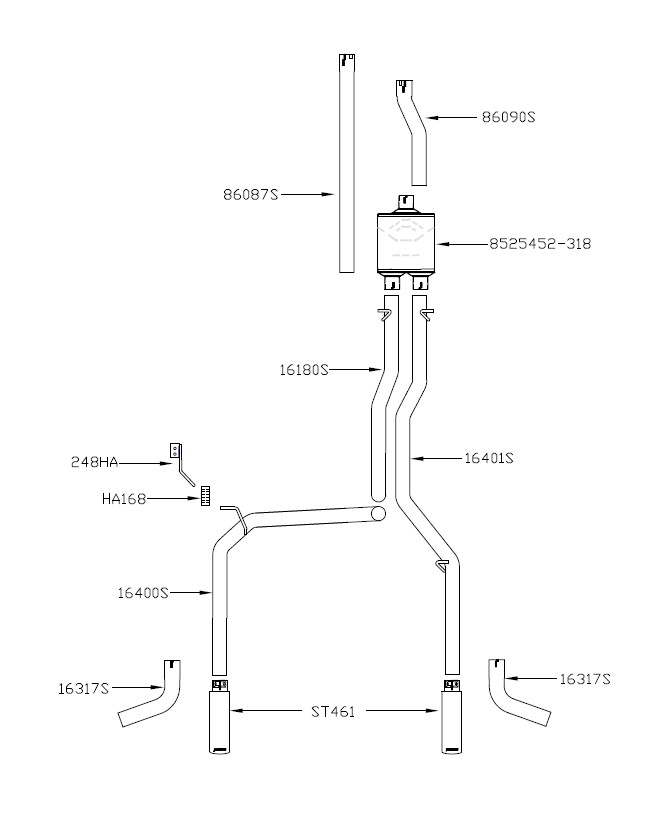
1) Identify your wheelbase length to determine extension pipe requirement. For 120” WB, the 86087S pipe will not be used. For 139” WB, trim 18” off the end of the 86087S. For 157” WB, use the 86087S as provided.
2) Place the extension pipe #86087S (if required) in position on the pipe from the catalytic converter. Install a clamp but do not tighten at this time.
3) Place a provided clamp onto the expanded end of inlet pipe #86090S and then place onto the back of the extension pipe installed in step 2. Tighten the clamp enough to hold but still allow for adjustment.
4) Place a provided clamp onto the muffler inlet and then place onto the inlet pipe and support with a stand. Tighten the clamp enough to hold but still allow for adjustment.
5) Using the provided 5/16” bolts, nuts and washers bolt hanger #248HA to the frame on the drivers side of the vehicle using the two holes about an inch apart on the outside of the frame where the shock is located. Then slide the rubber hanger #HA168 onto the frame hanger.
6) Place a clamp onto both muffler outlets, then place the right side tailpipe #16401S in position over the axle and into the right side muffler outlet. Place the two hangers welded to the pipe into the rubber mounts on the vehicle. Tighten the clamp enough to hold.
7) Place the front section of the left side tailpipe #16180S into the left side muffler outlet and connect the hanger on the pipe to the rubber mount on the vehicle. Tighten the clamp on the muffler outlet enough to hold.
NOTE: On some 1998 models, it may be necessary to trim 2 1/2” off of the rear of inlet pipe #86090S in order for the forward tailpipe hangers to align properly with the rubber mounts on the vehicle.
8) Place a clamp onto the expanded end of the rear section of the left side tailpipe #16400S and place onto the back of the front section by sliding the two sections together at the slip-fit connection behind the rear axle. Place the rear hanger into the rubber hanger you previously installed. Tighten the clamp enough to hold.
9) Place the two stainless tips #ST461 onto the ends of the tailpipes and adjust to the desired location. If you desire a side exit installation, you will need to trim about 12” off of the back of the tailpipes. Then use the two side exit pipes #16317S. The exit pipes have been left long enough to allow for adjustment, they may need to be trimmed to get the desired fit.
10) Adjust the position of all pipes and muffler to provide a satisfactory fit. A minimum of 3/4” clearance around all parts of the system must be maintained; while also keeping suspension travel and vibration in mind.
11) Tighten all clamped connections down securely. Place the supplied 7/16” hanger keepers onto the ends of all the hangers. These will prevent the hangers from slipping out of the rubber mounts.
12) To prevent the rear axle breather tube from contacting the left side tailpipe, and possibly being damaged, use the enclosed zip tie to fasten the rear axle breather tube to the brake line bracket located on the frame. Be sure to allow enough slack in the hose for the suspension to fully compress and extend.
13) For a cleaner appearance and more secure installation, we highly recommend welding all slip-fit connections. If you live in a geographical area that has harsh winters or sees a great deal of precipitation, the use of high temperature paint over the welded areas can help to prevent surface rust and premature corrosion.
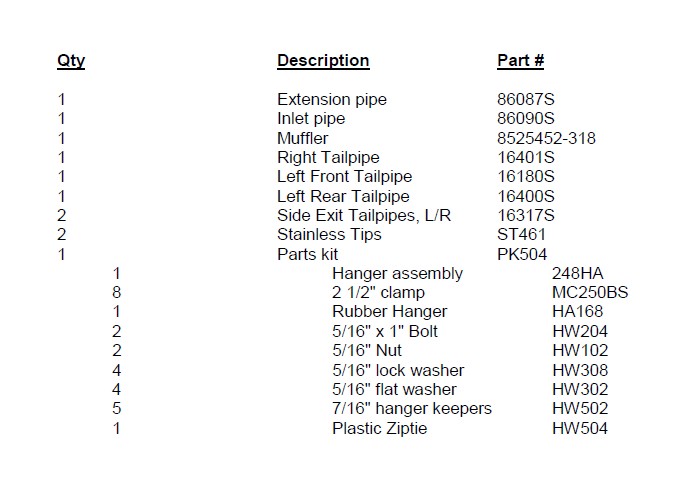
PACKING LIST