 FREE 1 to 3-Day Delivery on Orders $149+ Details
How to Install Tuff Country 1.5 in. Leveling Kit on your Dodge Ram
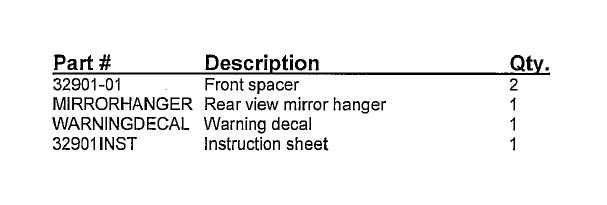
PARTS LIST:
Special Note:
A strut compressor is going to be needed to perform this installation. If you do not have a strut compressor you may rent one from your local Auto Parts store.
Due to the inconsistencies of the stock strut, height after installation of the spacer may very. Any questions please feel free to contact Tuff Country or your local Tuff Country dealer.
Congratulations on your selection to purchase a Tuff Country EZ-Ride Suspension System. We at Tuff Country are proud to offer a high quality product at the industries most competitive pricing. Thank you for your confidence in us, and our product.
Before installation begins, it is the customers/ installers responsibility to make sure that all parts are on hand. If any parts are missing, please feel free to call one of our customer service representative @ (800) 288-2190.
Make sure to use locktite on all new and stock hardware associated with this installation.
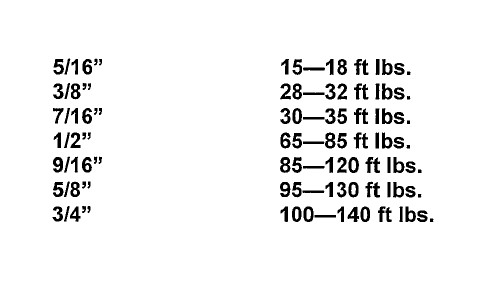
Torque Settings
Please follow instruction carefully
Before installation begins, measure from the center of the hub, to the bottom of the fender well, and record measurements below.
Pre installation measurements:
Driver side front: __________________________
Passenger side front: ______________________
At the end of the installation take the same measurements and compare to the pre-installation measurements.
Post installation measurements:
Driver side front: __________________________
Passenger side front: ______________________
1. To begin installation, block the rear tires of the vehicle so that the vehicle is stable and can't roll backwards. Safely lift the front of the vehicle and support the frame with a pair of jack stands. Place a jack stand on both the driver and passenger side. Next, remove the wheels and tires from both sides.
2. Working on the driver side, remove the stock outer tie rod hardware from the stock spindle. Save the stock nut for later re-installation. Carefully brake the stock taper on the stock outer tie rod. Special Note: Take special care not to damage the stock outer tie rod dust boot.
3. Working on the driver side, remove the stock sway bar end link from the stock location and save the stock hardware.
4. Working on the driver side, remove the stock upper ball joint form the stock steering knuckle. Set the stock hardware a side for later re-installation. Special note: Take special care not to rip or tear the stock ball joint dust boot.
5. Working on the driver side, remove the (3) upper stock nuts that connect the stock strut into the stock location. Save the stock nuts for later re-installation.
6. Working on the driver side, remove the stock lower bolt that connects the lower stock mounting point to the stock lower strut. Remove the stock strut assembly and stock lower bolt and set a side for later re-installation. Repeat procedure on the passenger side.
Special note: A strut compressor is going to be needed to perform this installation. If you do not have a strut compressor you may rent one from your local Auto Parts store.
7. Working on the driver side strut assembly that was removed from step # 6, carefully compress the stock strut using a strut compressor. Special note: Scribe a reference mark on the top of the stock strut nut. This will allow you to reinstall the stock nut back into the stock position. Remove the stock nut and hardware from the top of the stock strut assembly. Save the stock hardware for later re-installation.
8. Remove the stock upper strut bracket from the strut assembly and set a side for later re-installation.
9. Locate (1) new front spacer. Using a strut compressor, compress the stock strut enough so that the new front spacer can be installed. Install the new front spacer and secure the stock strut assembly with the stock upper hardware that was removed from step # 7. Refer to the reference mark that was scribe in step # 7. Torque to 45 ft lbs. Special Note: Make sure to use thread locker or lock tite.
10. Locate the (3) stock upper nuts that where removed in step # 5. Install the stock strut with the new spacer into the stock upper location and secure using the stock hardware. Torque to 35 ft lbs. Special note: Make sure to use thread locker or lock tite.
11. Locate the stock lower strut hardware that was removed in step # 6. Secure the lower portion of the stock strut into the stock location using the stock hardware. Torque to 65 ft lbs. Special note: Make sure to use thread locker or lock tite.
12. Locate the stock upper ball joint hardware that was removed in step # 4. Working on the driver side, install the stock upper ball joint to the stock steering knuckle and secure using the stock hardware. Torque to factory specs.
13. Locate the stock sway bar end link hardware that was removed in step # 3. Working on the driver side, install the stock sway bar end link to the stock location and secure using the stock hardware. Torque to factory specs.
14. Locate the stock outer tie rod hardware that was removed in step # 2. Install and secure the stock outer tie rod to the stock spindle using the stock hardware. Torque to 38 ft lbs. Special Note: Make sure to use thread locker or lock tite.
15. Repeat steps 2 - 14 on the passenger side.
16. Re-install the tires and wheels and safely lower the vehicle to the ground.
Check and double check to make sure that all steps were performed properly. Once the installation is complete take your vehicle directly to an alignment center for a proper front end alignment.
Congratulations installation complete
Take the vehicle directly to and alignment shop for a proper front end alignment


