FREE 1 to 3-Day Delivery on Orders $149+ Details
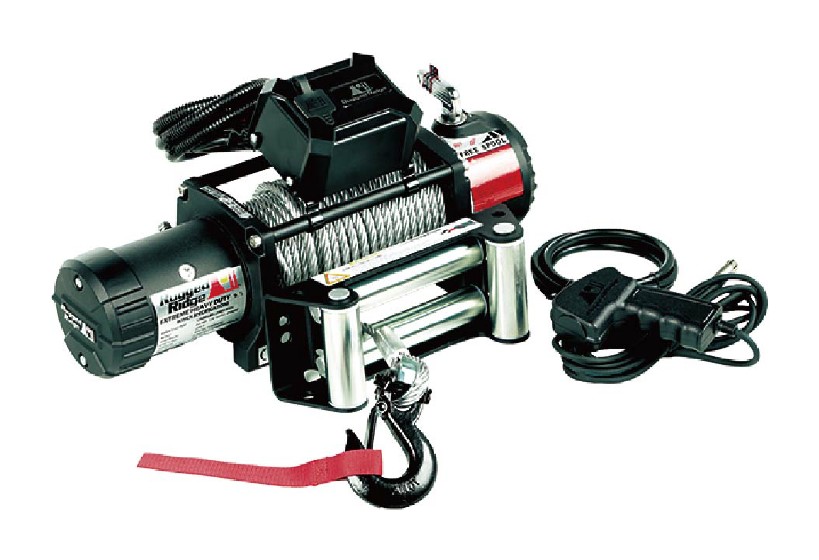
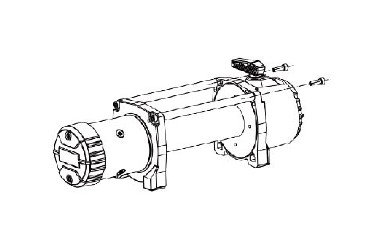
How to Install Rugged Ridge Nautic 12,500 lb. Winch w/ Steel Cable on your Ram
A FEW WORDS ABOUT PRODUCT SAFETY
Your Rugged Ridge' vehicle recovery winch is a powerful tool adding considerable utility and enjoyment to your off road vehicle. Keep in mind, however, that your vehicle's weight, the forces required for vehicle recovery and the variety of terrain, grades and cable rigging you might encounter, result in any winching operation having the potential for serious personal injury or damage to your winch or vehicle. Each winch operation may involve different risks making it impractical to provide warnings or information regarding all the risks you may encounter. Fully understand your Rugged Ridge'" instructions and practice safe winch operations before attempting an actual vehicle recovery.
vehicle recovery. To reduce winch-related risks and help you make informed decisions about safety, the accompanying instructions provide certain information in the form of "Warnings". "Cautions- and "Notices". This information alerts you to potential hazards that could hurt you or others.
NOTICE: This is a caution against anything which may cause damage to your winch, the vehicle or its equipment if the caution is ignored. The Notice includes information about how you can avoid or reduce those risks.
WARNING: This is a signal telling you that you or others CAN he KILLED or SERIOUSLY HURT if you don't follow the Warning. The Warning includes information about what you must or must not do in order to reduce the risk of injury to yourself and others.
CAUTION: This is a signal telling you that you or others CAN be HURT if you don't follow the instruction. The Caution includes information about how you can avoid those risks.
WARNING
CABLE ENTANGLEMENT/PINCWCRUSH HAZARDS
Failure to follow these instructions could lead to severe injury or death. Consult further WARNINGS/CAUTIONS and instructions in this use/installation manual.
Due to loads involved, all winching involves significant risks. To minimize risks of injury Always:
• Assure winch, mounting, cable and hook are undamaged. Vehicle, slope and conditions should not approach maximum rated pull. Leave a safety margin.
• Use supplied hook strap when spooling in or out (no load). Use gloves and keep fingers and body clear of _ipejmcri hook, cable and fairlead during installation and all winch operations.
• Position operator inside vehicle when possible with control switch routed through window rather than door jam. Keep others a safe right angle from cable and vehicle when winching (min. 1.5 times distance of cable). Use greatest cable length possible while keeping at least five turns around spool.
• Fully engage clutch before powering cable in. Do not disengage or adjust clutch while under load. Pull in stages to avoid heat buildup and motor damage.
• Never use vehicle recovery winch for persons or as hoist.
Installing Your Winch
WARNING: Read and understand all instructions and related Warnings, Cautions and Notices before attempting to install or use your Rugged Ridge® winch.
CAUTION: Installation requires purchase of a four-point mounting plate or properly equipped bumper unique to your vehicle. Dimensional footprint of your Rugged Ridge® winch is included with parts list at back of these instructions. Verify that the strength of the fasteners, mounting plate and vehicle frame attachment exceeds maximum rated pull of winch. Consult your retail distributor for available mounting plates and bumper options.
1. Align winch so that it sits flush and square on chosen mounting plate. Secure winch to mounting plate using 3/8" x 1-1/4" fasteners and fender washers supplied.
You may find it convenient at this time to feed the cable lead through the roller fairlead hole before you secure your winch plate/bumper. Note: Depending on your bumper, you may want to install your roller fairlead before you secure your winch. This will allow easy access to the roller fairlead back bolt.
NOTICE: Winch must be used with Fairlead to avoid damage to cable, spool and gears. Mount fairlead using supplied fasteners and assure it is centered over spool so cable will wind tightly and evenly in direction of arrow ONLY (see arrow on spool side-plate).
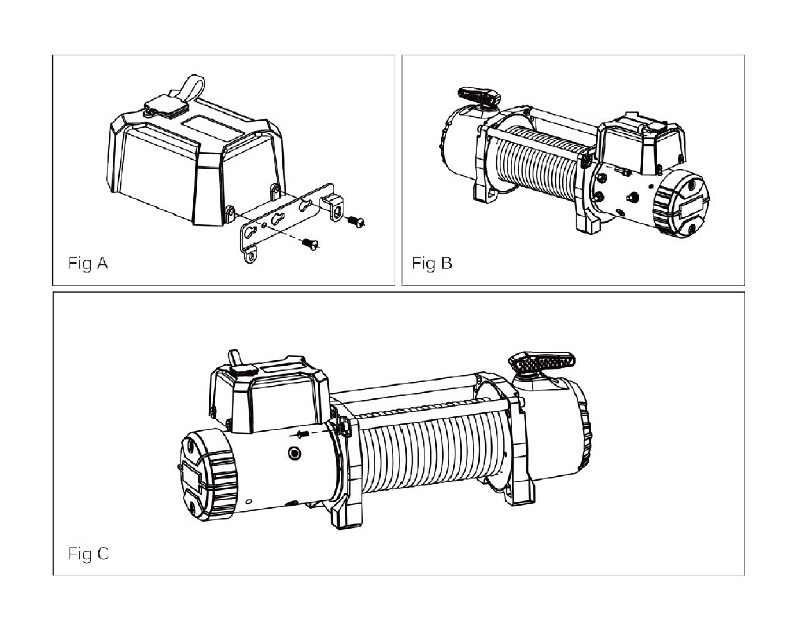
2. Mount solenoid box according to following illustration. Note: control box can be attached either above motor base or on top of spool tie bars. Use brackets and hardware supplied, securing threads with red Loctite ®. See following pages.
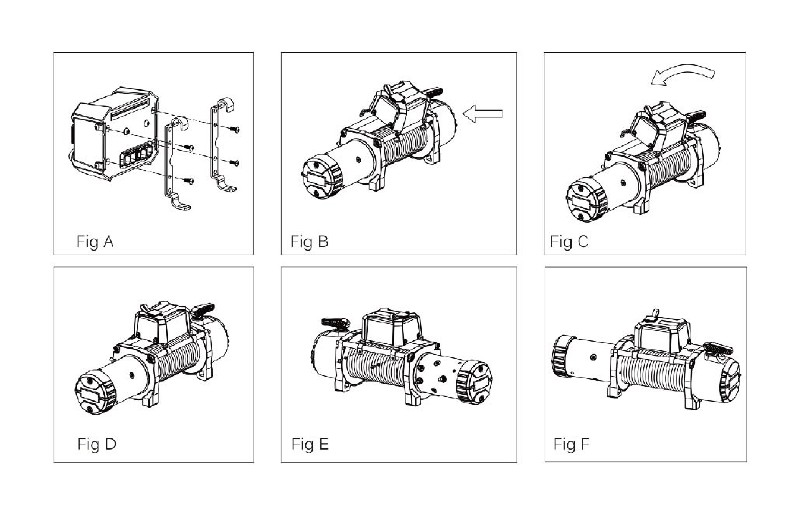
Solenoid Mounting Supplement 1
Step 1: Install the long mounting brackets with spaciers (hook facing forward) on the solenoid box and tighten the bolt. (Fig A )
Step 2: Place solenoid on top of tie-rods with hooks facing forward in desired location Secure by tightening the screws in the rear. (Fig B,C,D,E,F)Installation is now complete.Use the wiring diagram in instruction manual for further assembly.
Solenoid Mounting Supplement 2
Step 1:Connect the long mounting bracket and L mounting bracket by bolt (Fig A) .
Step 2: Install the whole mounting bracket (hook facing forward) on the solenoid box and tighten the bolt ( Fig B ) .
Step 3: Place solenoid on top of tie-rods with hooks facing forward in desired location.Secure by tightrning the screws in the rear. (Fig C)Installation is now complete. Use the wiring diagram in instruction manual for further assembly.
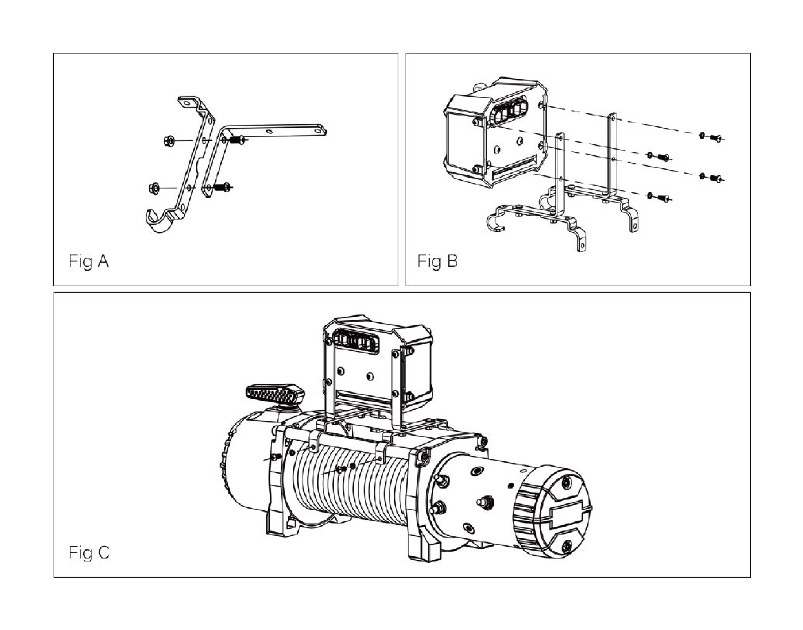
Solenoid Mounting Supplement 3
Step 1:Loosen the bolt on the side of solenoid box and place the small mounting bracket at the side of solenoid box , tighten the bolt.(Fig A)
Step 2: Loosen the tie rod bolt at the motor side, and place the control box in the desired location, and then tighten the holt. (Fig B)
Step 3: Tighten the logo bar bolt at the motor side. Installation is complete. Use the wire diagram in the instruction manual for further assembly. (Fig C )
Solenoid Mounting Supplement 4
Step 1: Select the appropriate bracket hardware for your installation.Rugged Ridge supplies two over spool mounting options. Depending on your bumper,winch plate, or application, you will need to determine which bracket choice to use. The angled bracket allows the solenoid to be angled forward to ensure proper clearance of plug for hand controller relative to bumper overriders or stinger applications.
Step 2: Configure & attach brackets as shown for mounting of Solenoid Box over spool.
Step 3: Attach Solenoid Box to the tie bars over spool by hooking the Mounting Bracket around front tie bar and securing at the rear with the 2 screws provided,making sure all cables are located between the solenoid box and the tie bar.

WARNING
To avoid risk of severe injury to eyes and body when working around batteries and electrical components:
• Always wear eye protection and remove watches, jewelry.
• Never lean over battery or connection being made.
• Leave remote switch disconnected to prevent inadvertent spool movement and accident.
• Never route electrical cables: across sharp edges or through door jams; through or near moving parts; near parts that become hot.
• If drilling or cable supports required, verify area is clear of fuel lines, brake lines and other electrical cables.
• Install insulating boots on all exposed terminal posts and assure wiring/cables remain insulated and protected from heat, vibration and wear.
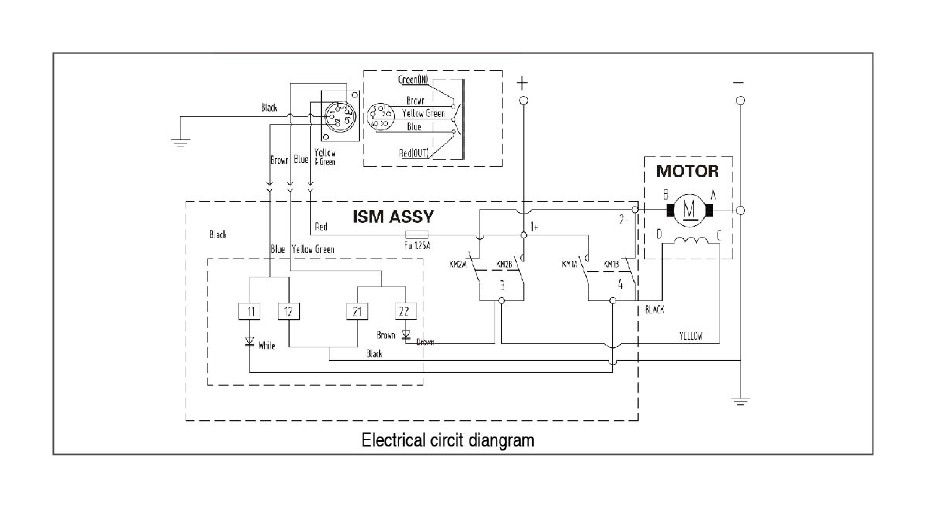
Electrical Connection
For normal self-recovery work, your existing electrical system is adequate. A fully charged battery and proper connections are essential. Run the vehicle engine during winching operations to keep battery charged.
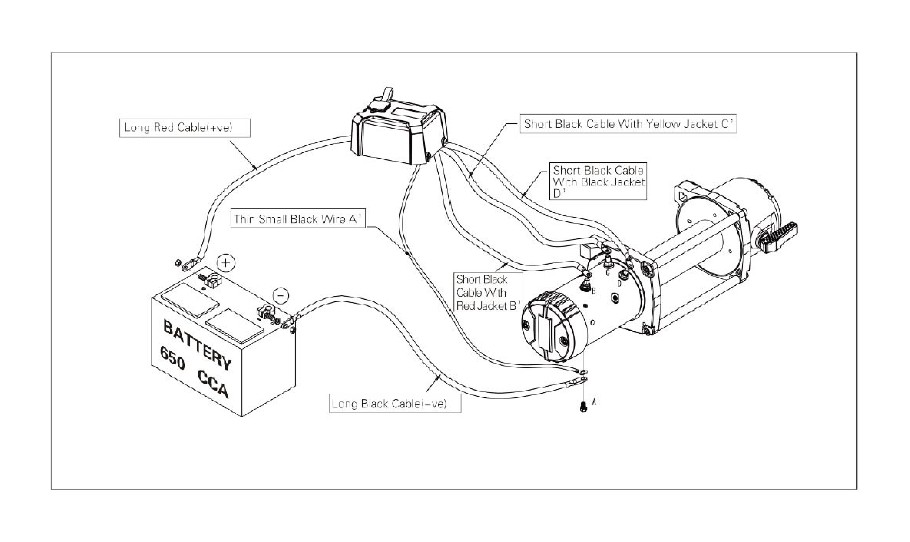
Ply doe attention to proper electrical cable connection as follows(refer to Diagram 1)
1 .Short black cable with red jacket (B)connecking to the red terminal (B)of the mokor.
2. Short black cable with yellow jacket (C') connecting to the yellow terminal (C)of the motor
3. Short black cable with black jacket (D')connecting to the black terminal (D)of the motor
4. Thin black cable (E)connecting to bottom terminal (A)of the motor
5. Long Black Cable(1.8m). one termini (A') connecting to the bottom terminal (A)Of the motor, and the other terminal negative( - )connecting to negative( • )terminal of battery
6. Long red cable positive( )connecting to positive( )terminal of battery
REMOTE CONTROL SWITCH
NOTE:
1 .Your battery must he kept in good condition.
2. Be sure battery cables are not drawn taught across any surfaces, which could possibly damage them
3. Corrosion on electrical connections will reduce performance or may cause a short.
4. Clean all connections especially in remote control switch and receptacle.
5. In salty environments use a silicone sealer to protect from corrosion.
6. Index the heads of the plate sutds into the keyhole slots on the back of the winch.
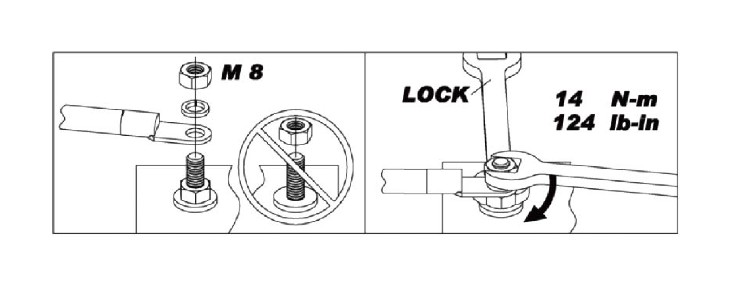
Motor Wire Nuts Mounting Instruction
Step 1:Do Not screw wire nuts too tight.
Step 2:Put a wrench on bottom nut when installing wire nuts to prevent movement of terminal stud and hold downnut. It' s helpful to avoid bolt broken during installation. See pictures below.
NOTICE: Rating and condition of vehicle battery will affect winch performance. Minimum required battery is 650 CCA, fully charged.
CAUTION: Corrosion on electrical connections and battery terminals will reduce power and winch performance. Keep battery charged.
WINCH OPERATION
SUGGESTION:
The best way to get acquainted with how your winch operates is to make a few test runs before you actually need touse it. Plan your test in advance. Remember you can hear your winch as well as you can see it operate. Get to recognize the sound of a light steady pull, a heavy pull, and sounds caused by load jerking or shifting. Soon you will gain confidence in operating your winch and its use will become second nature to you.
OPERATING:
Pre/post op check list. Check fasteners for torque before each outing. Inspect wiring and make sure connections are tight before each outing. Verify there is no chafing or cutting of wires. Inspect rope for damage before and after each use. Inspect remote for damage and function. Check range on wireless remote, if applicable, replace battery if necessary. Keep winch clean, remote socket covered and steel cable lightly lubricated. Synthetic rope needs to be kept clean and free from any chemicals or dirt. Refer to owners manual for more information.
NEVER operate winch with less than 10 wraps of synthetic rope or 6 wraps of steel cable around the drum. The terminal end is to prevent the rope from unraveling, it is NOT a load bearing attachment point. Improper instillation and/or spooling out to last layer will put a load on the terminal end and the rope will release from the terminal.
Always re-spool winch rope under a minimum 1000 lb. load before each use.
Always re—spool winch rope under a minimum 1000 lb. load before each
use.
1 .Ensure the vehicle is secured by applying the parking brake or chocking the wheels.
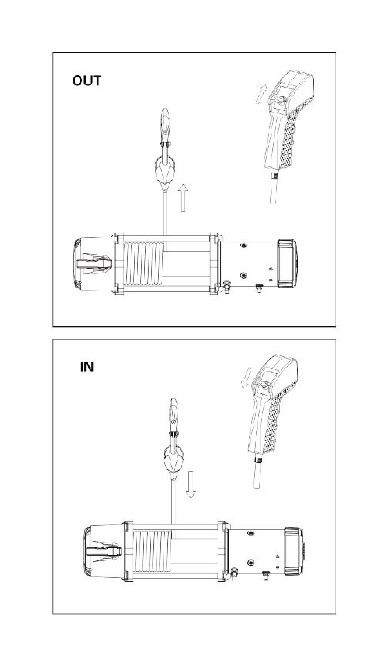
2. Pull out the winch cable the desired length and connect to an anchor point. The winch clutch allows rapid uncoiling of the cable for hooking onto the load or anchor point. The shifter tab located on the gear housing of the winch operates the clutch as follows:
(A) To disengage the clutch, move the clutch shifter tab to the ''OUT position. Cable may be free spooled off the drum.
(B) To engage the clutch, move the clutch shifter tab into the ''IN" position. The winch is now ready for pulling.
3. Recheck all cable rigging before proceeding.
4.Plug in the winch hand control. It is recommended that the winching operation taker place from the driver,s position to ensure safe
5.To commence winching operation.start vehicle engine.seiect neutral in transmission,maintain engine speed at idle.
6.Operate the remote control switch to IN or OUT until the vehicle has been retrieved.Regularly check the winch to ensure cable is winding onto the drum evenly.
Note:
1 .Never winch with your vehicle in gear or in park, which would damage your vehicle' s transmission.
2. Never wrap the cable around the object and hook onto the cable when winching.
3. Keep hands, clothing, hair and jewellery clear of the drum area and cable when winching.
4. Never use the winch if the cable is frayed, kinked or damaged.
5. Never allow anyone to stand near the cable, or in line with the cable behind the winch while it is under power. I f the cable should slip or brake, it can suddenly whip back towards the winch, causing a hazard for anyone in the area. Always stand well to the side while winding.
6. Don' t leave the switch plugged in when winch is not in use.
7. Do not use as a hoist
8. Power out only to relieve slack on cable or rope.Excessive powering out can cause damage to internal components.
9. Do not use to hold loads.
10. Do not use to drop loads(example-unloading vehicles).
CHECK THE WINCH CAREFULLY AND THOROUGHLY BEFORE OPERATING!
CAUTION: Gable or synthetic rope must be unspooled, stretched and respooled before first use. (See Installation instructions and use warnings below). Gable must be re-wound in direction of arrow for spool brake to function (see arrow on spool side-plate).
NEVER MOVE CLUTCH WHEN CABLE IS UNDER LOAD DR SPOOL MOVING.
WARNING: Use supplied hook strap when spooling in or out (no load). Use gloves and keep fingers and body clear of hook, cable and fairlead during installation and all winch operations.
4. Cable or synthetic rope must be stretched and spooled under tension to prevent over-wraps and damage. For initial spooling. disengage clutch and using gloves. keep tension on cable while having assistant evenly wind the first five wraps for cable, or a full layer for synthetic rope, by hand rotating spool in direction of arrow (see spool side plate).
5. Next, secure hook to suitable anchor, connect power switch, engage clutch and slowly power spool while maintaining tension so that cable spools tightly and evenly. Rolling load of vehicle should provide proper initial tension (500 lbs./230 kg. min.) while providing opportunity to practice winch operation and safety procedures. Stop spool when hook is 6 feet/2 meters from fairlead. Attach and secure hook to vehicle frame. Slowly take up any slack.
WARNING: To avoid unintentional starting when winch is not in use: (a) remove & secure remote switch & (6) keep clutch disengaged.
Clutch and Control Handle Operation
A. Clutch Operation
1. Free spool by disengaging clutch. Move clutch lever clockwise to the "OUT" position. Cable may now be pulled off spool using supplied hook strap. DO NOT FORCE CLUTCH HANDLE. Use control handle to rotate drum, aligning gear to free spool.
2. To power spool fully engage clutch. Move clutch lever counterclockwise to the "IN" position. Winch is now ready for vehicle recovery using power switch. Avoid powering spool in reverse as this increases wear on spool brake. Return clutch to "Out- position after completing pull and assuring vehicle is stable.
B. Power Switch Operation
Keep control handle in secure location, attaching before and detaching after each winch operation.
NOTICE: Avoid internal damage by breaking each vehicle recovery into segments and allowing motor to cool. Do not continue
Planning and Use of Your Moll
WARNING: Read and understand all instructions and related Warnings, Cautions and Notices before attempting to install or
1. Ensure vehicle, slope and conditions do not approach maximum rated pull. Leave a safety margin. Winch provides greater mechanical advantage when cable is fully extended. Plan pull using as much cable as practical. Double line using snatch block is preferred.
WARNING: Secure cable attachment requires at least five (5) wraps on Spool. Do not extend red painted cable.
2. Plan and center anchor and snatch blocks or rigging so cable pulls straight to winch. Confirm anchor point will support load with adequate safety margin. Where anchor is tree use trunk protector and shackle rated at least double maximum winch pull. Where anchor is vehicle, (see below) fully engage cable hook through towing eye or shackle rated at least double maximum winch pull. Attach to vehicle frame not bumper or winch mount.
CAUTION: Vehicle to Vehicle winching not recommended as it may exceed capacity of winch, mounting or cable. Do not drive vehicle while winching. Avoid slack cable or shock loads from rolling vehicle to reduce risk of failure. Maintain steady tension through winch and block vehicle at safe intervals. Winch not intended to tow vehicles or secure loads. Never use recovery strap as part of winch operation. Stretch/stored energy in recovery strap may create shock load.
3. Extend cable manually by disengaging clutch to free spool. Confirm cable hook fully engages anchor, strap or shackle. Do not fix hook back around cable to avoid damage. Confirm power switch on Control Handle is "OFF" and attach remote. Fully engage clutch before powering spool. Keep vehicle motor running to avoid battery drain.
WARNING:
• Always keep hands, body and clothing clear of cable, hook and fairlead during operation and spooling.
• Reduce risk of cable-related injury by clearing persons and establishing safe zone equal to at least 1.5 times length of cable.
Keep operator away from cable and line of pull. Operate from inside vehicle if possible. If not. operator should be at right angle to cable and protected by vehicle where possible. To avoid electrical short. never route remote switch through vehicle door jam.
Confirm anyone assisting understands recovery plan and safety precautions.
• Always wear gloves and use supplied hook strap when handling cable: never touch cable under tension. Never work under or over cable under tension. Use Rugged Ridge° dampener or substitute (heavy blanket) over cable mid-point to dampen energy in event cable fails. Slack cable before moving blanket or tree limb.
4. Plan your pull, recognizing recovery winches are not intended for continuous duty. Heavy load and slow line speed indicate high amperage draw causing heat build-up in motor. (A NOTICE }Avoid damaging motor by adjusting to shorter pull cycles and longer cool-down periods under heavy load. Do not continue power to stalling motor.
5. Begin pull by gradually taking tension on cable to avoid shock loads. As you power in. cable must wind tightly and evenly on drum to prevent over-wraps and cable damage. Avoid side-pull on spool or cable stacking against spool side plates.
WARNING
CABLE ENTANGLEMENT HAZARD
Cable must rewind in direction of arrow indicated on spool housing for spool brake to function. If cable stacks or does not spool properly, block or secure vehicle and slowly power-out problem section. Keeping gloved hands clear of fairlead and spool, reposition cable to opposite side of spool. Stand clear of winch while gradually regaining tension on cable.
6. Complete pull by securing vehicle in gear with parking brake on. Slowly power cable out to remove tension before securing rigging.
NOTICE: Cable must be stored evenly and tightly on spool to prevent damage. Using gloves, grasp cable in sections at least 6 feet (2 meters) from fairlead. Slowly power cable onto spool while maintaining light tension to produce tight, even wraps.
WARNING
• Always keep hands, body and clothing clear of cable, hook and fairlead during operation and spooling.
• Wire spurs and strands from cable can cause serious injury. Always use gloves and do not allow cable to slip through hands. Maintain at least 6 feet (2 meters) between your position with cable and fairlead. For control and safety, keep power switch with person holding cable strap.
• Always use hook strap when hook is within 6 feet (2 meters) of fairlead. Secure hook to vehicle frame or tow eye and slowly power spool to complete storing cable under light tension. Remove and secure power switch.
Maintenance
WARNING: Do not use winch if damaged, submerged in water, in presence of flammable vapors or if cable is frayed or kinked. INSPECT BEFORE EACH USE.
1. Using gloves and observing all WARNINGS and CAUTIONS described above inspect cable and hook on regular basis and replace as necessary with cable or hook of equal strength. Cable clamp on spool must be secured with red Loctite when replacing cable. Consult synthetic rope manufacturers load ratings, recommendations and warnings if replacing cable with hi-strength synthetic rope.
2. Using safety glasses, inspect winch, mounting plate and attachment hardware for damage or wear. Carefully trace electrical connections, from winch to control and back to battery, assuring connections are secure and protected, cables are undamaged and battery remains fully charged (minimum 650 CCA, fully charged). Replace or repair as necessary.
3. Winch is lubricated at factory and should not require additional lubrication. As electrical component winch is not intended to be submerged in water. If submerged have winch serviced immediately to prevent damage and corrosion. Spare and replacement parts for your Rugged Ridge' vehicle recovery winch are available from your retail distributor. See parts list attached.
WARNING
Your safety and the safety of other motorists is very important. Your Jeer is an off road capable vehicle that readily lends itself to restoration and customizing. As the owner of a modified suspension vehicle, you are the person choosing the combination of suspension, wheels, tires, drive train and accessories that best fit your intended use. Likewise, you are the person responsible for the safety and legality of the vehicle you modify. In modifying your vehicle's suspension, balance your off-road capabilities against how the vehicle may actually be used off-road and on-road. It is not practical or possible to warn about all hazards associated with your Jeep" restoration or modifying your suspension for improved off road capabilities. Start by familiarizing yourself with all vehicle manufacturers' instructions and warnings and the instructions and warnings accompanying your affermarket product. Follow recommended maintenance procedures and routinely inspect your vehicle components for unusual wear or off-road damage. Restoration parts are direct replacements of original components and are not designed or warranted as meeting current safety standards (including FMVSS). Always wear seat belts and/or appropriate off-road restraints, reduce your speed, tread lightly and safely enjoy your off-road vehicle.
Winch Motor Clocking
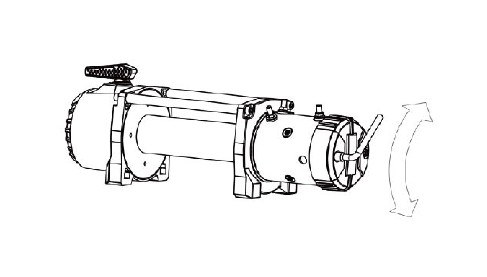
Step 1:To clock the winch motor ,which can be achieved without taking the winch tie rod, motor base and winch motor.
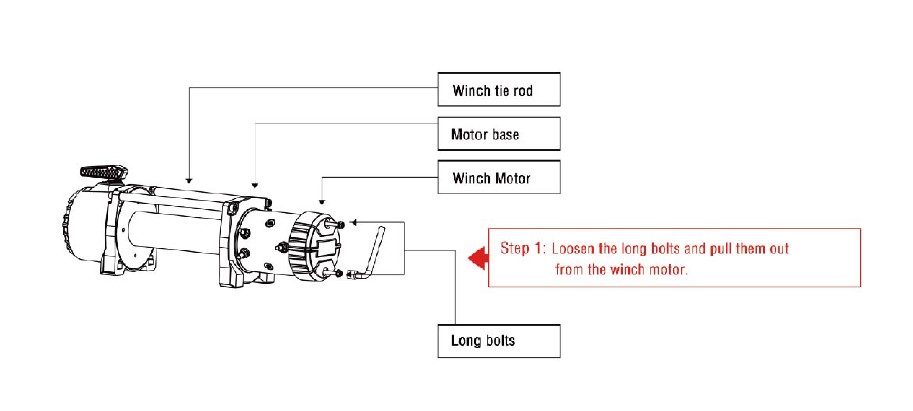
Step 2: Rotate the motor to required position.
Note: The rotation of winch motor must he 90 degree,180 degree, and or 270 degree clockwise or anti-clockwise,only because of the fixed holes on motor base.
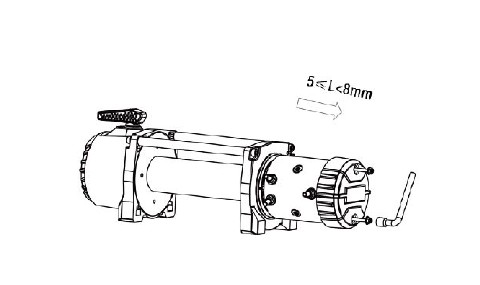
Step 3: Re-install long bolts to complete.
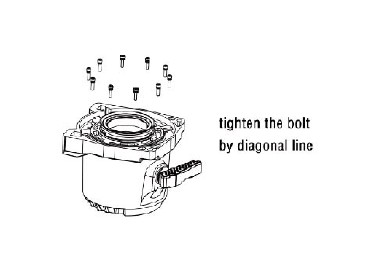
Gear Box Clocking Instructions
Step 1: Loose the tie roads to take the gear Lox apart from them.
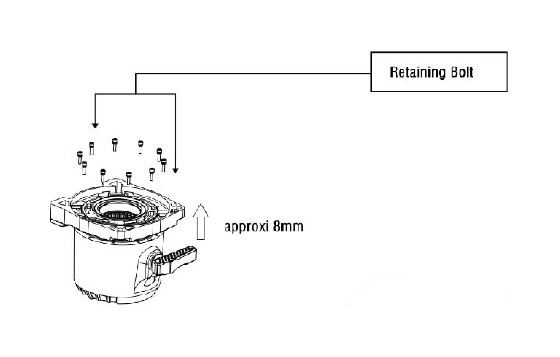
Step 2: Take off the retaining bolls (totally 10pcs)
Step 3: Get gear box rotated,then connect the gear box with the gear box base agairi.After that connect the gear box with the tie.

No pis; The rotation of gear box must be 36 degree,or a degree which is themultiple of 36 degree clock-wisely or anti-clock-wisely due tq the fixed holesto receive the connection with the retaining Bolts.
VEHICLE RECOVERY ELECTRIC WINCH USE & INSTALLATION INSTRUCTIONS
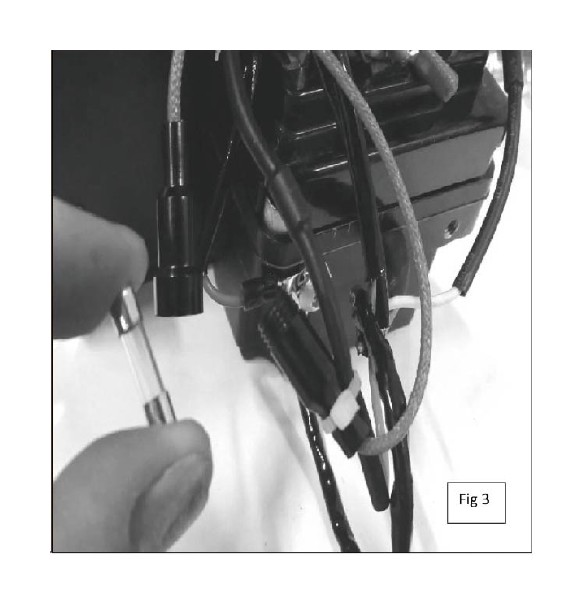
Rugged Ridge® control box fuse. 5mm diameter X 20mm length2 Amp time-delay rating
WARNING:
only replace fuse with the same amp rating.
Rugged Ridge winches are equipped with a fuse inside the control box. This fuse provides protection in the case of an internal failure or overload.
If winch fails to function, you may need to inspect the fuse.
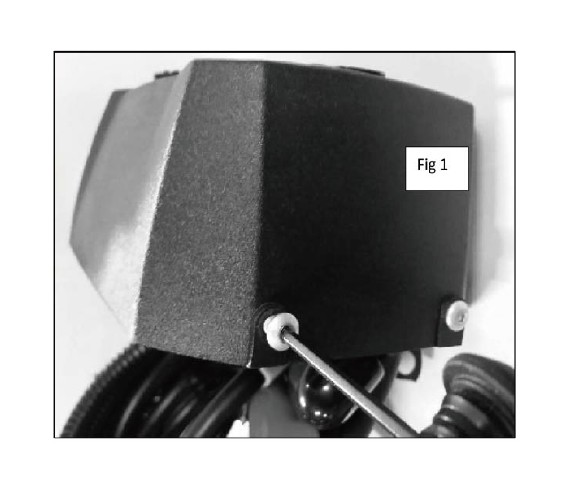
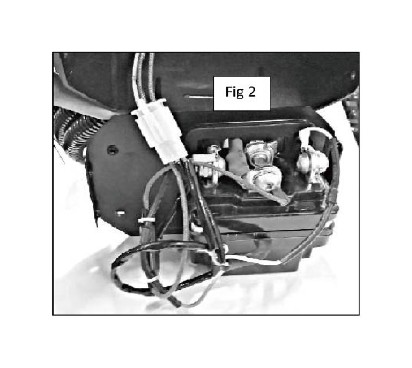
Step 1. Remove control box cover bolts. Carefully remove control box cover. There will be remote plug wires attached to the cover. Fig 1 2
Step 2. Unscrew fuse holder halves. Fig 3 Step 3. Remove fuse by unscrewing the fuse case halves and inspect for breakage, replace if necessary.
NOTE: If the replaced fuse blows immediately, please contact local distributor.
Step 4. Carefully re-assemble control box, taking care to avoid damage/pinching of wires.

• The first digit indicates the level of protection that the enclosure provides against access to hazardous parts (e.g., electrical conductors, moving parts) and the ingress of solid foreign objects.
• The second digit indicates protection of the equipment inside the enclosure against harmful ingress of water.